Risky Sign-Ins vs Risky Users Conditional Access Policies
Table of Contents
- Introduction
- What Are Sign-In Risk and User Risk?
- How Risk Is Detected
- Sign-In Risk vs User Risk Detections and Typical Levels
- Where These Policies Lived Before
- Step-by-Step: Creating a Sign-In Risk Policy
- Step-by-Step: Creating a User Risk Policy
- Self-Remediation of Risk
- Phase Two: Protecting Administrator Accounts
- Monitoring Identity Risk Events
- Best Practices
- Training and Awareness
- References
- Closing Thoughts
Introduction
Microsoft Entra provides several layers of protection against compromised identities. Two of the most important controls are Sign-In Risk policies and User Risk policies. While they sound similar, they operate differently and should be configured with specific goals in mind.
In this article, we will break down the differences, show how these policies evolved from Identity Protection to Conditional Access, explain how Microsoft detects risks, and walk through step-by-step configuration. We’ll also cover best practices, training considerations, and an optional Phase Two focused on protecting administrator accounts.
What Are Sign-In Risk and User Risk?
Sign-In Risk evaluates the current sign-in attempt. Microsoft’s machine learning engine analyzes signals such as unusual IPs, impossible travel, TOR/anonymizer use, unfamiliar device, or leaked credentials. Based on the calculated risk level (low, medium, high), you can apply policies like requiring MFA or blocking access.
User Risk evaluates the user’s account as a whole. Instead of one login, it considers whether the identity itself appears compromised based on repeated anomalies, leaked credentials found on the dark web, or other indicators. A high-risk user is usually forced to reset their password before continuing access.
In short:
- Sign-In Risk = suspicious login attempt
- User Risk = potentially compromised identity
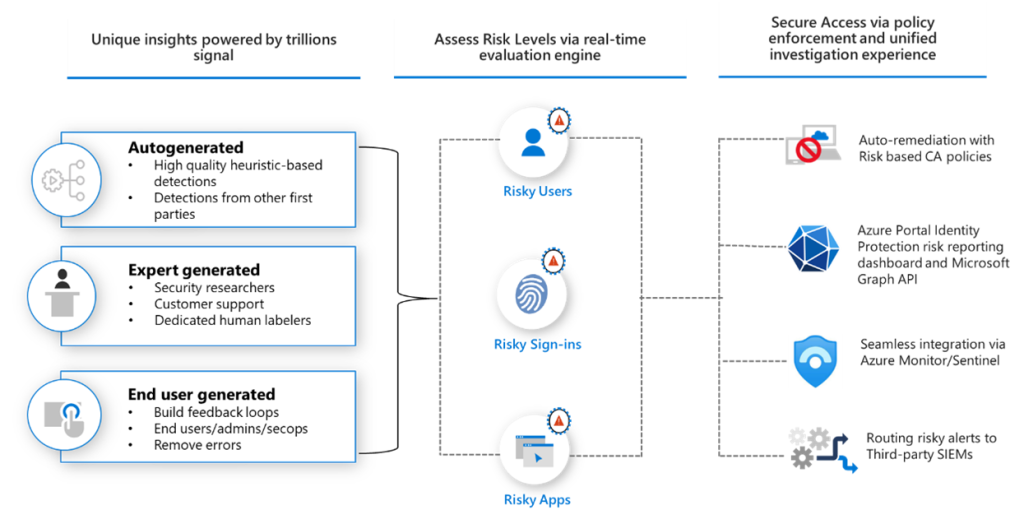
How Risk Is Detected
Microsoft calculates risk using a combination of global intelligence signals and telemetry from your tenant. Different detections apply to sign-ins versus user accounts.
Examples of Sign-In Risk detections include:
- Sign-ins from anonymous IP addresses (TOR, VPN exit nodes, anonymizers)
- Sign-ins from unfamiliar or atypical locations
- Impossible travel (e.g., logging in from Florida and then Tokyo within minutes)
- Sign-ins from malware-infected devices (via Microsoft Defender for Endpoint)
- Atypical sign-in properties such as unusual browser, OS, or session patterns
- Sign-ins using leaked or stolen credentials identified by Microsoft threat intelligence
Examples of User Risk detections include:
- Credentials discovered in public or dark web dumps (via Microsoft’s leaked credential detection)
- Multiple correlated risky sign-ins across different sessions or apps
- Malware-linked activity connected to a user’s account
- Identity compromise indicators from Microsoft’s global telemetry
Key data sources for risk detection:
- Microsoft Security Intelligence Graph – trillions of signals per day across Azure, Microsoft 365, and Windows endpoints
- Microsoft Defender telemetry – device risk, malware indicators, and endpoint compromise data
- Entra ID authentication logs – behavioral baselines and anomalies across sign-ins
- Dark web monitoring – continuous scanning for stolen usernames and passwords
By combining these sources, Microsoft can assign real-time risk scores to both sign-ins and users, which Conditional Access policies then act upon.
Sign-In Risk vs User Risk Detections and Typical Levels
| Category | Sign-In Risk (per login attempt) | User Risk (account-level) | Typical Risk Level |
|---|---|---|---|
| Anonymous Access | Sign-in from TOR, VPN, or anonymizer IP addresses | N/A | Low-Medium (alone = Low, with other anomalies = Medium) |
| Location | Sign-in from unfamiliar location or impossible travel scenario (e.g., two countries within minutes) | Multiple risky sign-ins correlated across different geographies | Low–Medium (unfamiliar location), High (impossible travel) |
| Device & Session | Sign-in from malware-infected or non-compliant device (Defender integration) | Ongoing malware-linked activity tied to the account | High |
| Behavioral | Atypical sign-in properties: new browser, OS, or unusual session patterns | Identity compromise indicators based on abnormal long-term behavior | Medium |
| Credentials | Sign-in using leaked or stolen credentials | Credentials found in public or dark web dumps | High |
| Source Data | Detected via Microsoft Security Intelligence Graph, Entra ID sign-in logs, Defender telemetry | Detected via Microsoft Security Intelligence Graph, Defender telemetry, dark web scans | N/A (data sources only) |
| Response Policy | Typically require MFA for high-risk sign-ins | Typically require password change for high-risk users (or block access for admins in Phase Two) | N/A (actions taken) |
This table makes it clear that sign-in risk is about a single suspicious login, while user risk is about the overall account being compromised.
Where These Policies Lived Before
Historically, Sign-In Risk and User Risk policies were configured under Entra Identity Protection. Admins could set policies for “Risky Sign-Ins” and “Risky Users” directly in that blade. While functional, it created a separate management experience from the rest of Conditional Access.
Today, Microsoft has consolidated these into the Conditional Access policy engine, giving administrators a single pane of glass for access control. This change improves consistency, reporting, and alignment with other CA conditions such as device compliance, location, or application sensitivity.

Step-by-Step: Creating a Sign-In Risk Policy in Conditional Access
- Navigate to Conditional Access
- Create a New Policy
- Click + New policy.
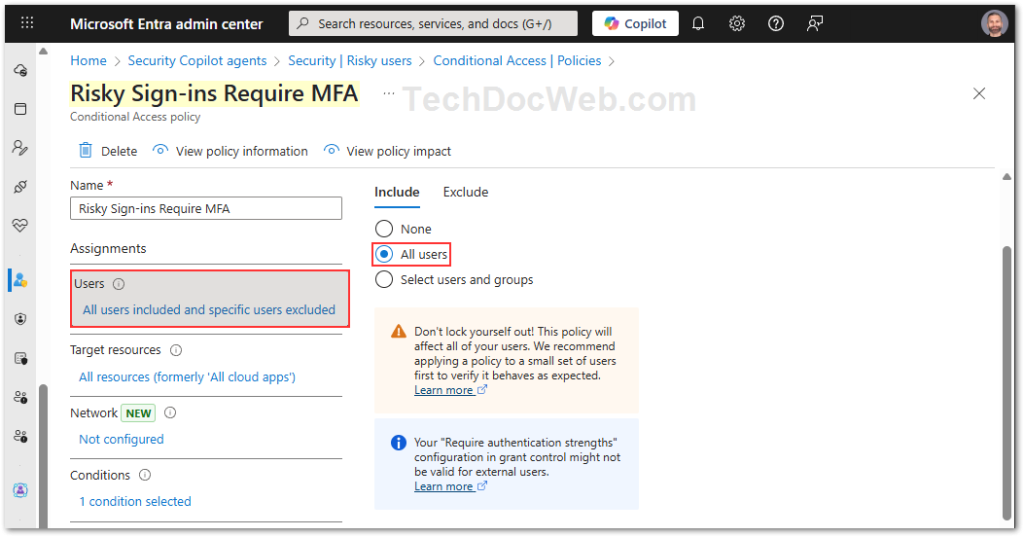
- Name the policy Risky Sign-Ins Require MFA.
- Assignments
- Users/Groups: Select the accounts this applies to
- Best practice: start with pilot users, phase rollout to IT, then other departments, and eventually include All Users).
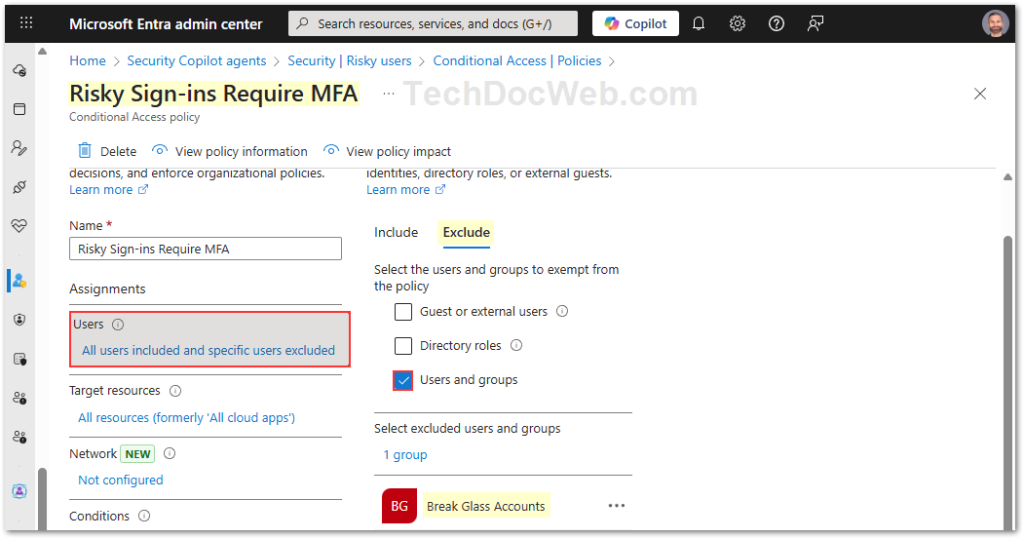
- Make an exclusion for Break Glass Accounts security group (Global Admin PIM-less account with a complex password and FIDO2 MFA that’s not regularly used and monitored)
- Cloud Apps: Apply to All cloud apps or specific sensitive apps.
- Conditions: Under Conditions > Sign-in risk, choose High and Medium.
- Users/Groups: Select the accounts this applies to
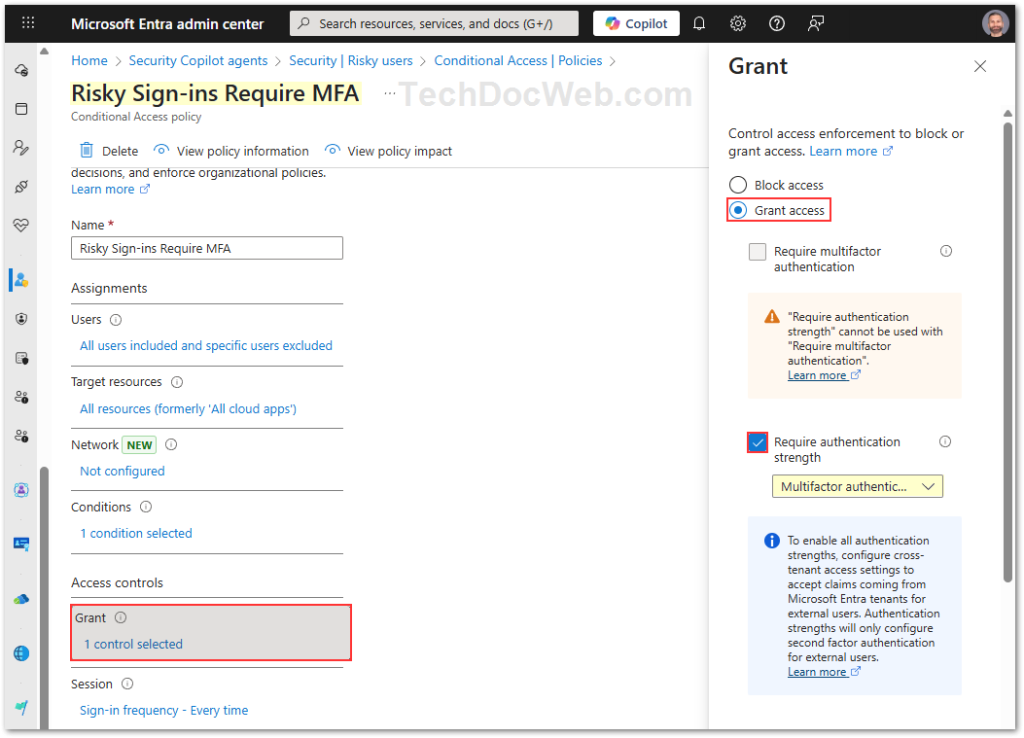
- Access Controls
- Under Grant, select Require authentication strength (preferred) or Require multifactor authentication (classic option)
- Enable the Policy
- Set the policy to Report-Only and save.
- After pilot testing and confirming successful operation, flip the policy to On and save.
- Set the policy to Report-Only and save.
Note: You should highly consider building custom Authentication Strengths in lieu of using the built-in Require Authentication Methods approach, as Microsoft’s best practice.
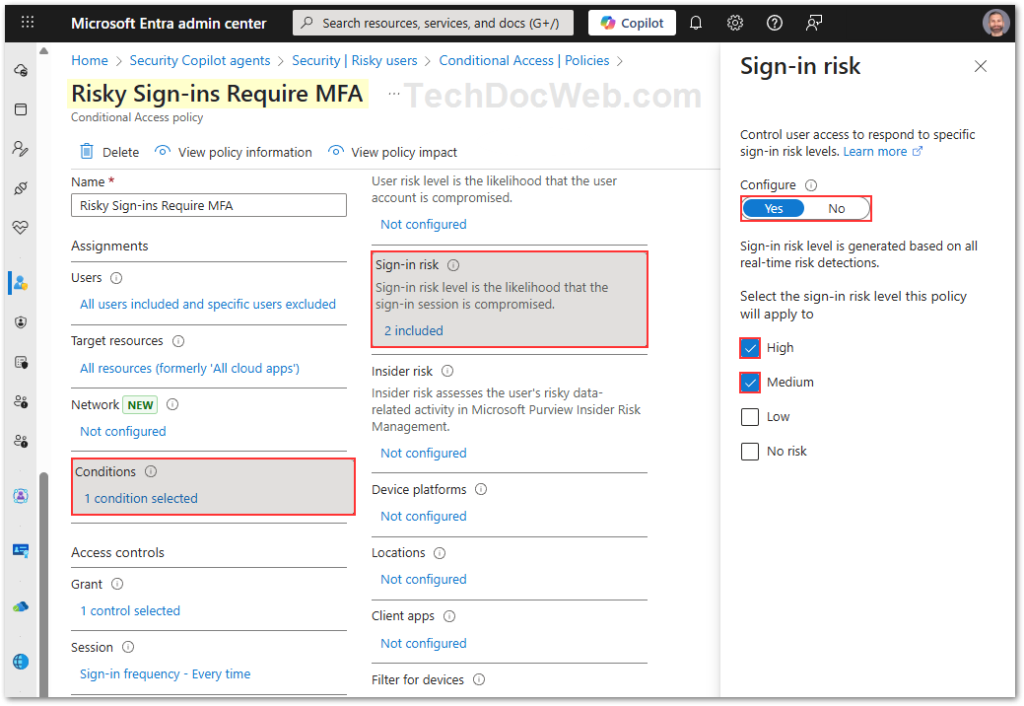
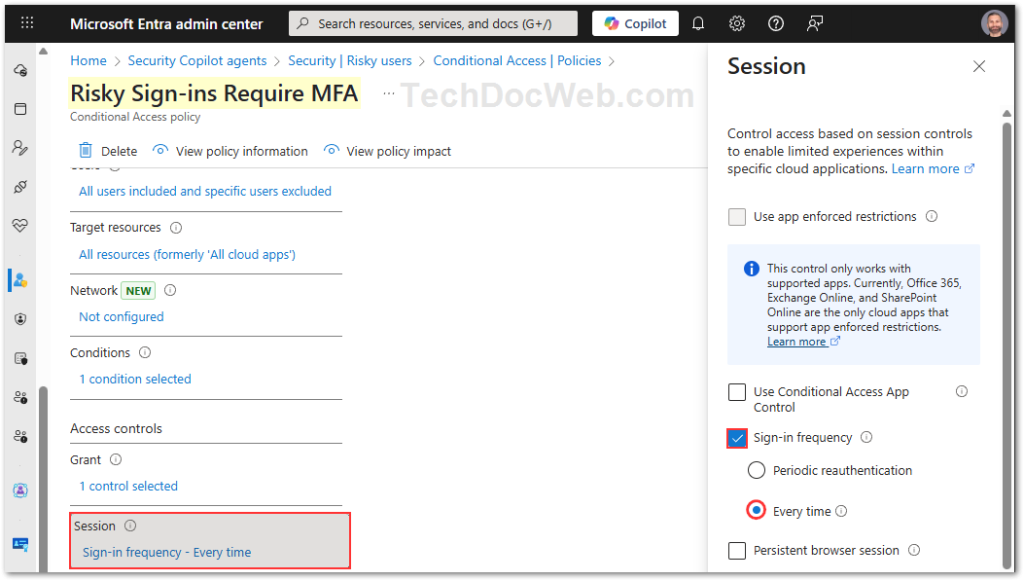
This ensures that whenever Microsoft detects a medium or high-risk sign-in, the user must pass MFA before gaining access.
Step-by-Step: Creating a User Risk Policy in Conditional Access
- Navigate to Conditional Access
- Create a New Policy
- Name it Risky Users Require Password Change.
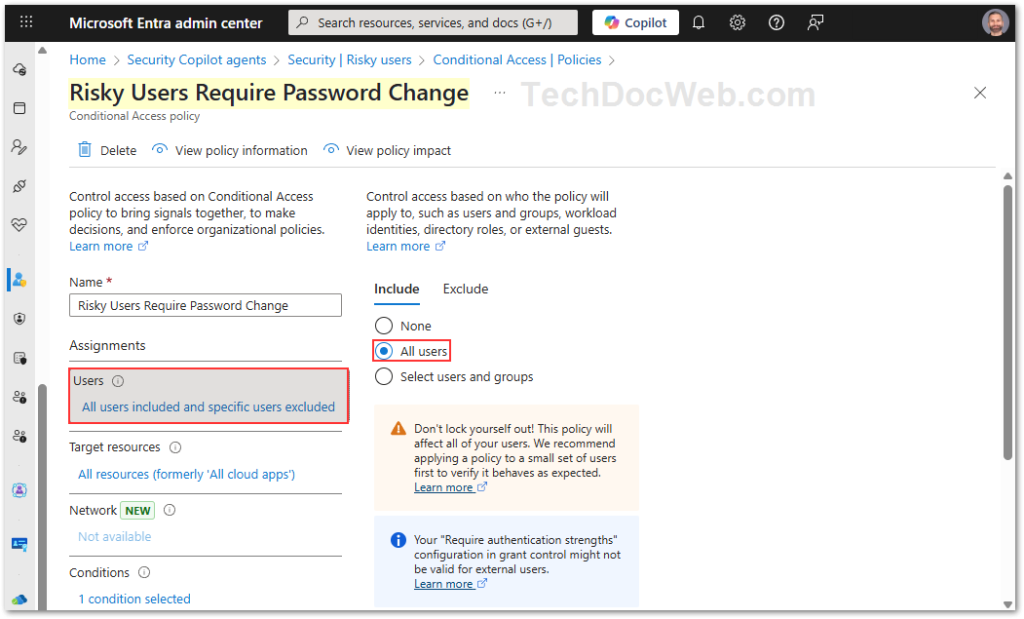
- Assignments
- Users/Groups: Select pilot users or specific groups first.
- Best practice: start with pilot users, phase rollout to IT, then other departments, and eventually include All Users).
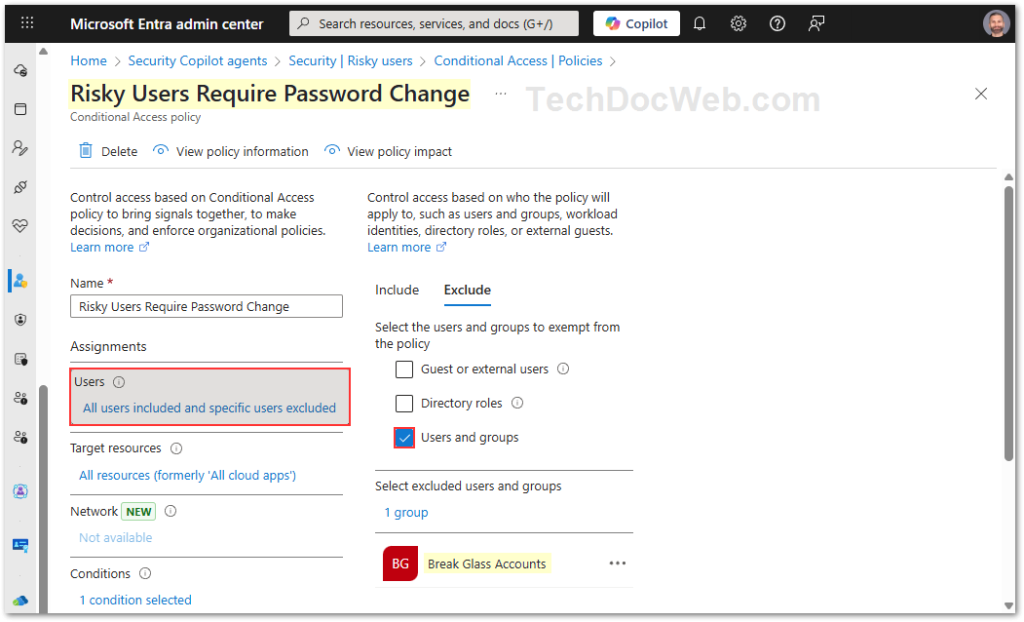
- Make an exclusion for Break Glass Accounts security group (Global Admin PIM-less account with a complex password and FIDO2 MFA that’s not regularly used and monitored)
- Cloud Apps: Apply to All cloud apps.
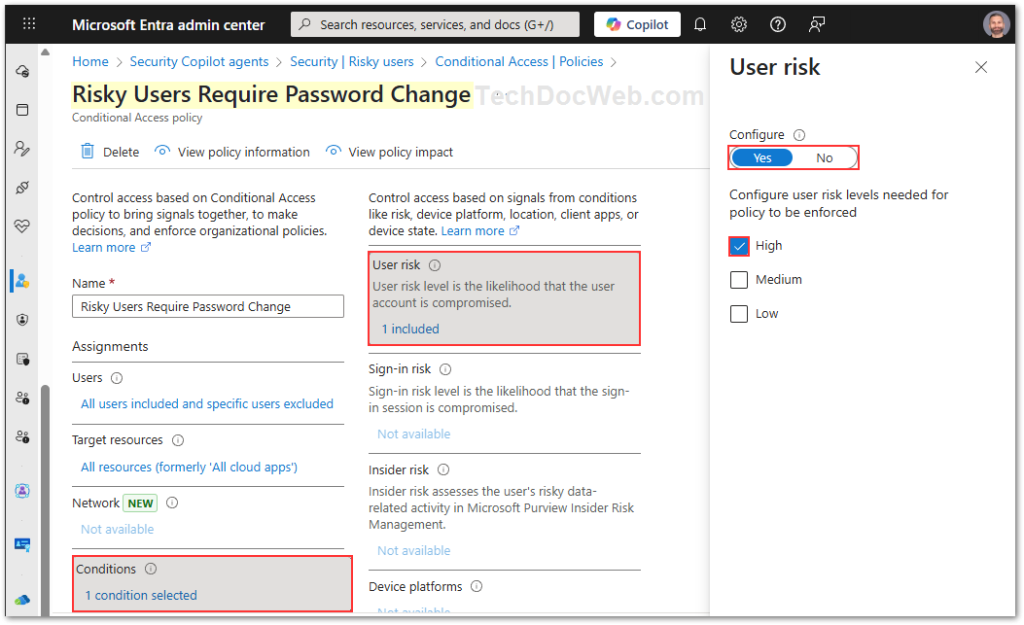
- Conditions: Under Conditions > User risk, select High.
- Users/Groups: Select pilot users or specific groups first.
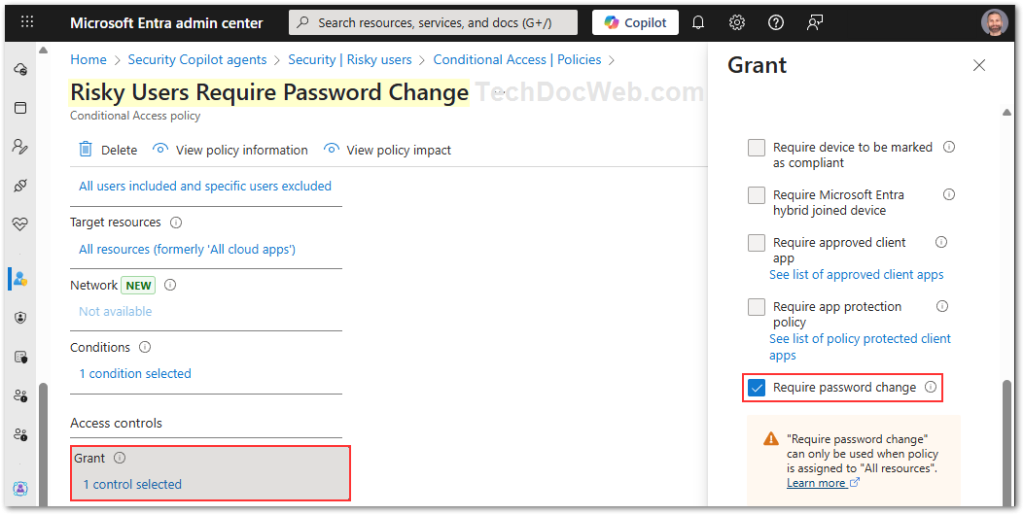
- Access Controls
- Under Grant, select Require password change.
- Enable the Policy
- Set the policy to Report-Only and save.
- After pilot testing and confirming successful operation, flip the policy to On and save.
- Set the policy to Report-Only and save.
This ensures that when a user is flagged as high-risk overall, they must reset their password before signing in again.
Self-Remediation of Risk
A major advantage of these policies is that users can often resolve risk events on their own.
Sign-in risk remediation occurs when a login is flagged as risky. Instead of being locked out, the user is prompted for MFA. If they complete it successfully, the event is cleared and marked as safe. Behind the scenes, the risk state changes from “at risk” to “remediated,” and the logs note that the user passed MFA. If MFA is not completed, the risk remains and may increase the user’s overall risk level.
User risk remediation occurs when an account itself is flagged as risky. In this case, the policy requires the user to change their password via secure self-service password reset (SSPR). Once the password is changed, the account’s risk state is downgraded to “remediated,” and logs record that a secure password reset was performed.
This self-remediation process reduces IT overhead, protects the organization, and allows legitimate users to quickly recover secure access.
Phase Two: Protecting Administrator Accounts
Once baseline Sign-In Risk and User Risk policies are deployed to standard users, organizations should plan a second phase focused on administrative accounts. These identities are highly privileged and a compromise here has much greater impact.
A best practice is to create a separate User Risk Conditional Access policy targeting administrator roles. Unlike standard users, where high risk triggers a password reset, for administrators you should go further and block access entirely when a user is flagged as high risk.
Administrator accounts are often targeted by attackers due to their broad access. Forcing a password reset may not be enough, since an attacker could still abuse existing tokens or elevated sessions. Blocking access immediately for high-risk admin accounts reduces the blast radius and ensures remediation only happens under controlled conditions.
Step-by-Step: User Risk Policy for Administrators
- Navigate to Conditional Access
- Go to Protection > Conditional Access > Policies.
- Create New Policy
- Name it Block High User Risk for Admins.
- Assignments
- Users/Groups: Select all administrator roles (Global Admin, Privileged Role Admin, Security Admin, etc.).
- Exclusions: Exclude your designated break-glass accounts to avoid lockouts. These should have strong monitoring and special protections in place.
- Cloud Apps: Apply to All cloud apps.
- Conditions: Under User Risk, select High.
- Access Controls
- Under Grant, select Block access.
- Enable the Policy
- Set the policy to On and save.
Monitoring Identity Risk Events
Configuring Conditional Access policies is only part of the solution. To make these policies effective, you need ongoing monitoring of risky sign-ins and user risk events. Microsoft provides several built-in reporting and integration options:
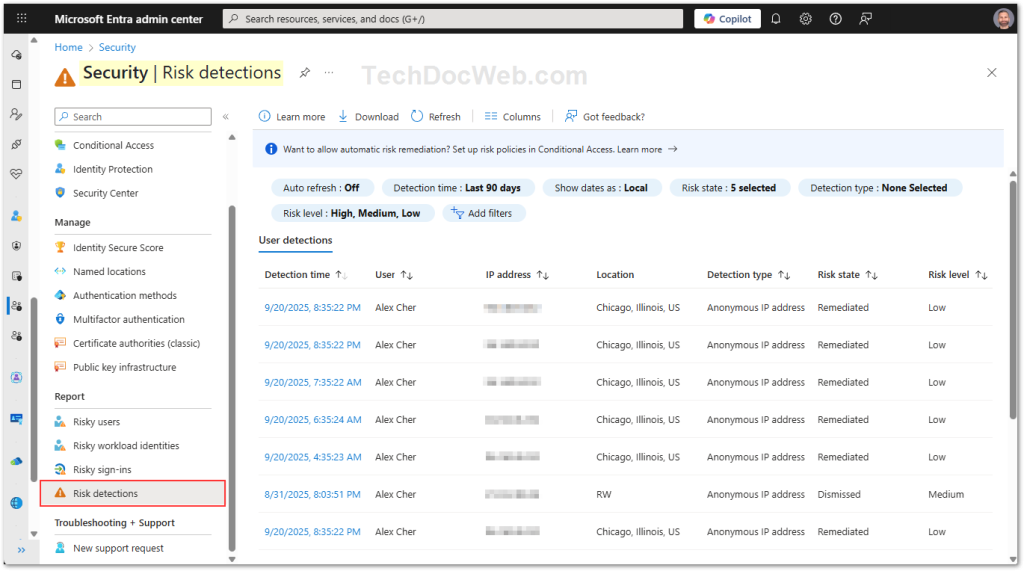
- Risk Detections (Entra ID portal): A consolidated feed of all risk events detected across your tenant. This includes both sign-in anomalies and user compromise indicators. It’s the best place to investigate the underlying reasons that triggered risk policies.
- Risky Sign-Ins (Entra ID portal): Lists individual sign-ins flagged as risky, with details such as user, IP, application, risk detail (anonymous IP, impossible travel, etc.), and risk state (at risk, remediated, dismissed).
- Risky Users (Entra ID portal): Shows which accounts are flagged as compromised, their current risk level, and whether they’ve remediated via password reset.
- Log Analytics / Sentinel: When Entra ID logs are connected, risky sign-ins and Identity Protection events flow into SigninLogs and IdentityProtectionRiskEvents tables.
SigninLogscontains fields likeRiskLevelDuringSignIn,RiskDetail,RiskState.IdentityProtectionRiskEventsprovides granular detections such asanonymousIPAddress,impossibleTravel, orleakedCredentials.
- Sentinel Workbooks: You can build dashboards to trend risky sign-ins over time, see a breakdown by detection type, and drill into events by user. For example, a workbook can show:
- Line charts of risky sign-ins by risk level (Low, Medium, High).
- Pie charts of detections by type (anonymous IP, impossible travel, malware, leaked credentials).
- Tables with user, IP, app, and remediation status.
Tracking these events gives you visibility into how often detections occur, whether users are self-remediating, and where you may need to adjust policies or increase user education.
Best Practices
- User Risk = Password Change
Always configure High user risk to force a password reset. - Sign-In Risk = MFA
For Medium and High sign-in risk, require MFA. - Admins = Block Access on High User Risk
Privileged accounts must be locked down tighter. - Report-Only Mode, Pilot, Phase Rollouts
Start the policy in a Report-Only mode to get the feel for it, work with a test group before applying org-wide, phase rollouts to different teams, starting with more tech savvy such as IT. - Combine With Other Conditions
Layer Conditional Access with device compliance, named locations, and session controls. - Monitor Risk Events and Tune Policies
Use Entra’s Risky Sign-Ins and Risky Users reports to reduce false positives and fine-tune thresholds.
Training and Awareness
User education is key. Employees should understand:
- Why they may be prompted for MFA during unusual activity.
- Why they may need to reset their password unexpectedly.
- That these policies are designed to protect their account, not hinder them.
References
Closing Thoughts
By configuring both Sign-In Risk and User Risk policies in Conditional Access, organizations can protect against suspicious logins and compromised accounts. Moving these controls into Conditional Access simplifies administration, provides a unified access control framework, and strengthens overall security posture.
For administrators, taking Phase Two seriously is critical. Blocking high-risk admin accounts, while excluding tightly monitored break-glass accounts, ensures that privileged access remains secure even under attempted compromise.
Found this useful? Share with others: