CSV to Identity: HR Provisioning with Entra
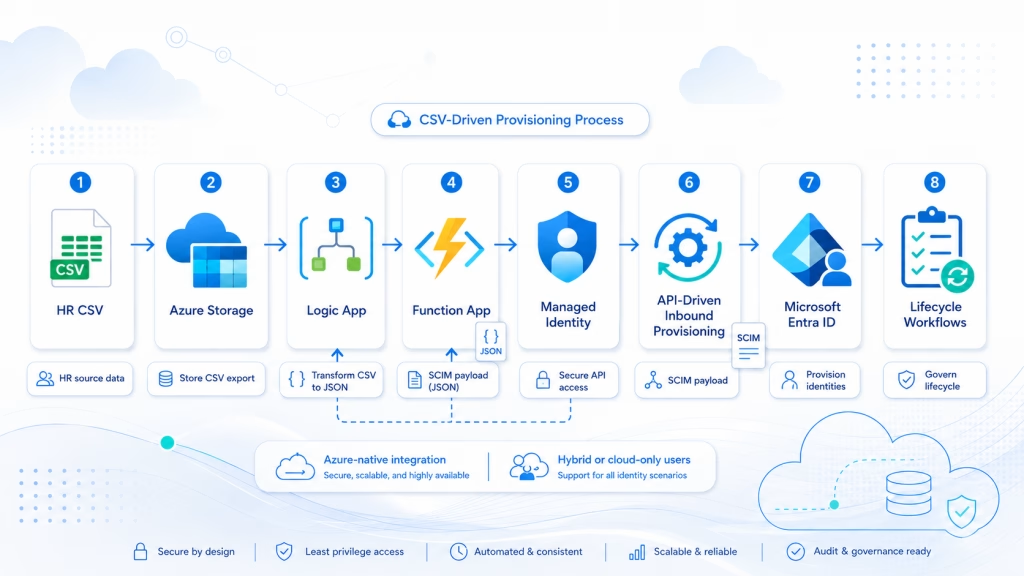
Most organizations don’t use one of Microsoft’s supported HR systems like Workday or SAP SuccessFactors. Instead, they rely on a legacy HR, ERP, or payroll application that can export employee information to a CSV file.
That doesn’t mean you have to give up on automated identity provisioning.
In this guide, we’ll build a practical solution using Microsoft Entra, Azure Storage, Azure Logic App, Azure Function App, Enterprise App, and the API-driven inbound provisioning service to automatically create and update user accounts from a CSV export. Whichever source HR platform you have, this approach can bridge the gap and bring HR-driven identity lifecycle management to your environment.
Prerequisites
Before building the workflow, make sure you have (or are able to create) the following:
- A Microsoft Entra tenant
- An Azure subscription
- Permissions to create and configure Azure Logic Apps
- Permissions to configure provisioning in Microsoft Entra
- An Azure Storage Account
- An Azure File Share for storing the HR export
- A sample CSV file from your HR, ERP, payroll, or finance system
- An Azure Function to convert CSV data into JSON
- An API-driven inbound provisioning application
- Microsoft Entra Provisioning Agent if provisioning users into on-premises Active Directory
- Microsoft Entra ID Governance or Microsoft Entra Suite licensing if you plan to use Lifecycle Workflows, Access Packages, or Access Reviews (optional for this guide)
Integration Overview
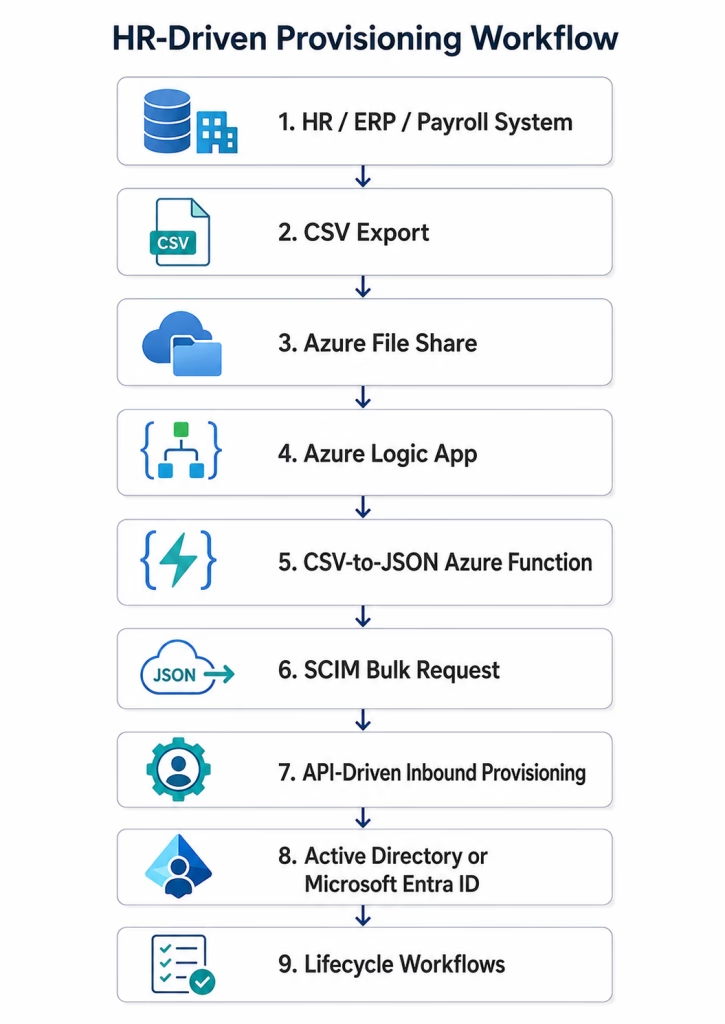
In this guide, the HR system generates a CSV export containing worker information. That file is uploaded to Azure Storage, processed by Azure Logic Apps, converted into JSON, transformed into a SCIM bulk request, and submitted to Microsoft Entra’s API-driven inbound provisioning endpoint.
From there, Microsoft Entra handles the user provisioning process based on the mappings and matching rules configured in the provisioning application.
For hybrid environments, the user can be provisioned into on-premises Active Directory. For cloud-only environments, the user can be provisioned directly into Microsoft Entra ID.
Why This Approach Matters
Not every organization uses a native HR integration such as Workday or SAP SuccessFactors. Many environments still rely on HR, ERP, finance, or payroll systems that can export employee data but do not have a direct Microsoft Entra provisioning connector. This approach bridges that gap.
Instead of manually creating accounts or relying on one-off scripts, this design uses Azure Logic Apps and Microsoft Entra’s provisioning service to create a repeatable, supportable onboarding process. The CSV file becomes the source feed, while Microsoft Entra handles identity matching, attribute mapping, provisioning, and lifecycle integration.
Licensing Considerations
It is important to separate user provisioning from identity governance.
You do not need Microsoft Entra ID Governance just to read a CSV file and provision users through API-driven inbound provisioning. However, you do need Entra ID Governance or Microsoft Entra Suite licensing if you want to use governance features such as Lifecycle Workflows, Access Packages, or Access Reviews.
| Capability | Entra ID Governance Required? |
|---|---|
| CSV import through Azure Logic Apps | No |
| API-driven inbound provisioning | No, but license and quota limits apply |
| Create users in Microsoft Entra ID or on-premises Active Directory through inbound provisioning | No, governance is not the base requirement |
| Lifecycle Workflows | Yes |
| Access Packages / Entitlement Management | Yes |
| Access Reviews | Yes |
| Custom task extensions in Lifecycle Workflows | Yes |
For this reason, the CSV-to-Logic-App portion should be viewed as the provisioning layer.
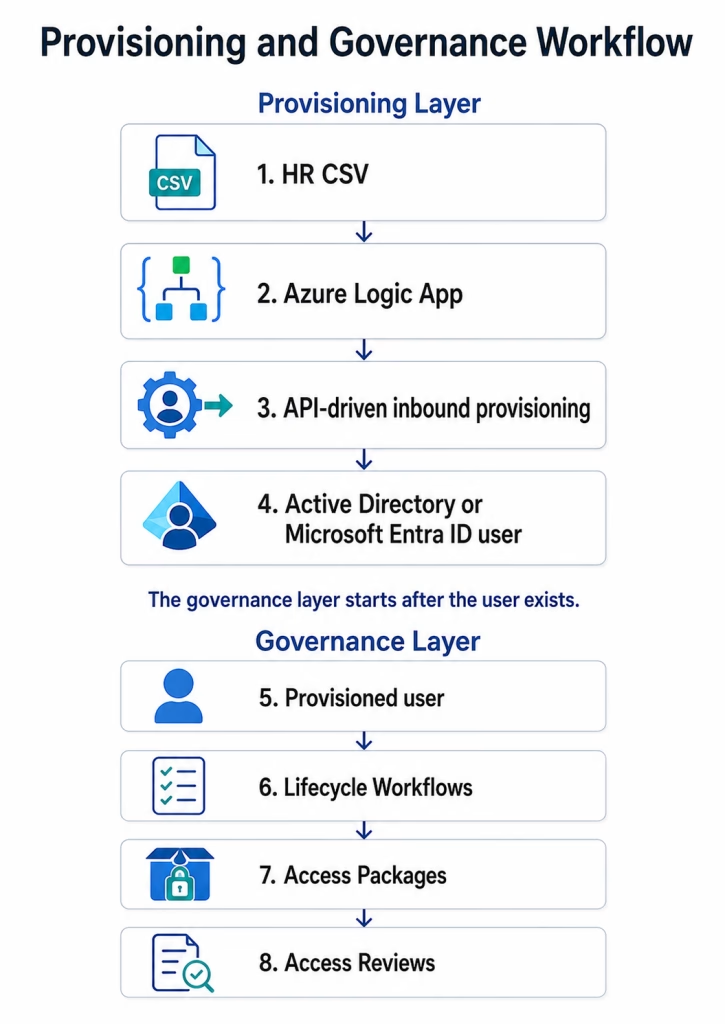
This distinction matters. If your only goal is to create users from a CSV file, this is automated provisioning. If you also layer on lifecycle automation, governed access, approvals, and reviews, then the solution starts to look and feel more like practical IGA.
Step 1 – Prepare the HR Export Location
Start by creating a dedicated location to store the CSV export from your HR system.
For this example, the file is stored in an Azure File Share. This gives the Logic App a predictable location to read from and makes it easier to secure, monitor, and replace the file as part of a scheduled export process.
Configuration steps:
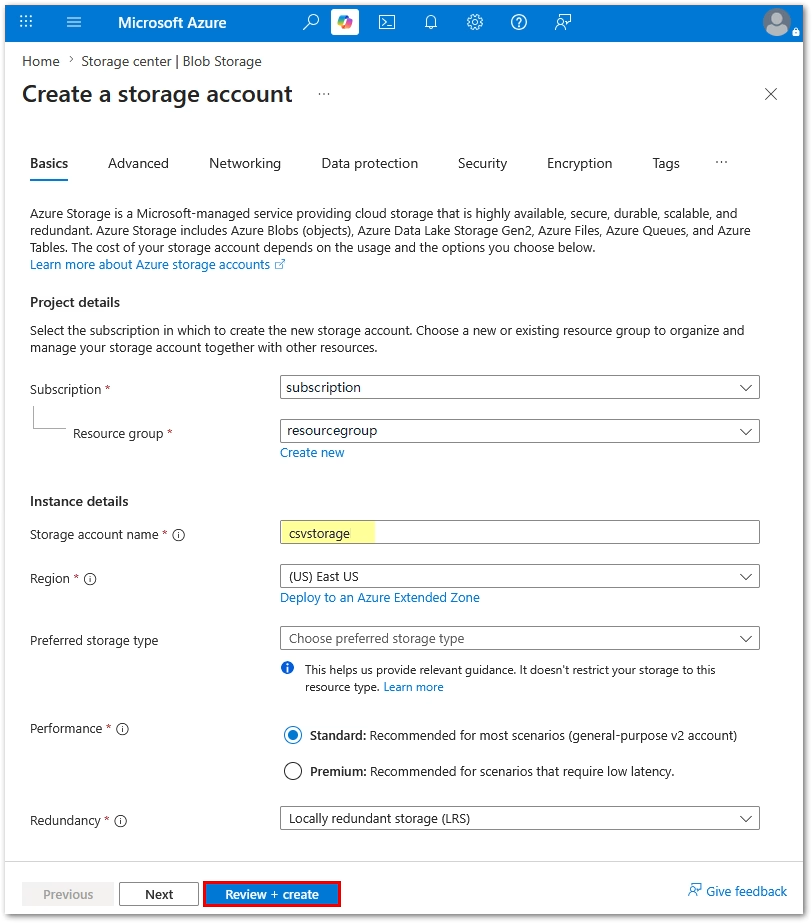
- Open the Azure portal
- Search for Storage Accounts and open
- Create a new Resource Group
- Then, create a new Storage Account in that group giving it a unique name
- Once Storage Account is created, go to the resource
- Navigate to Data Storage / Classic File Shares
- Create a new File Share, giving it a unique name
- Verify that you can see the file share
- Upload the employees.csv file to the folder
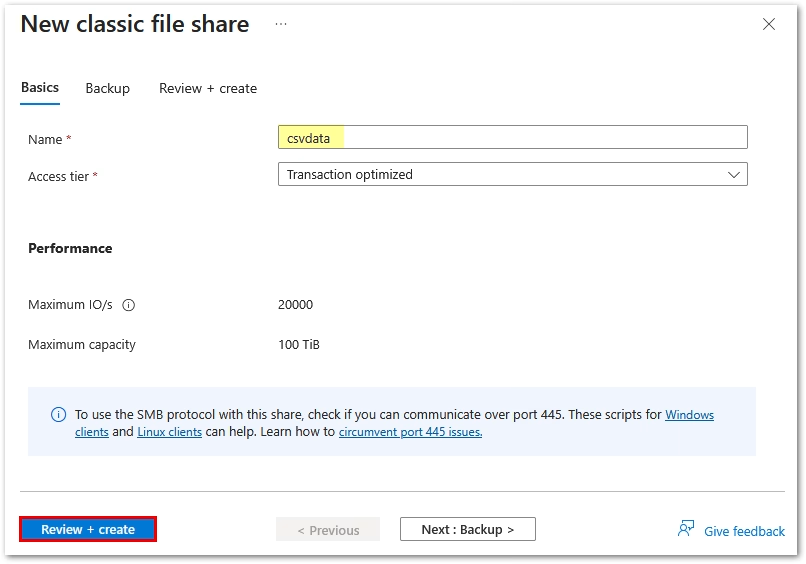
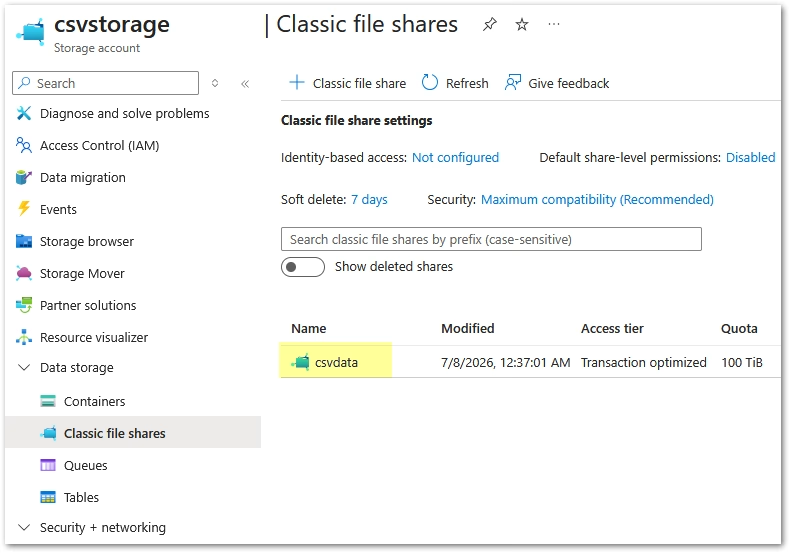
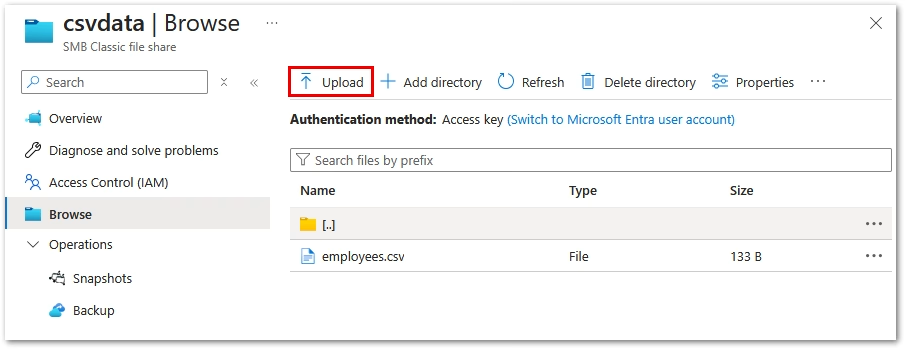
Sample CSV file:

Recommended structure:
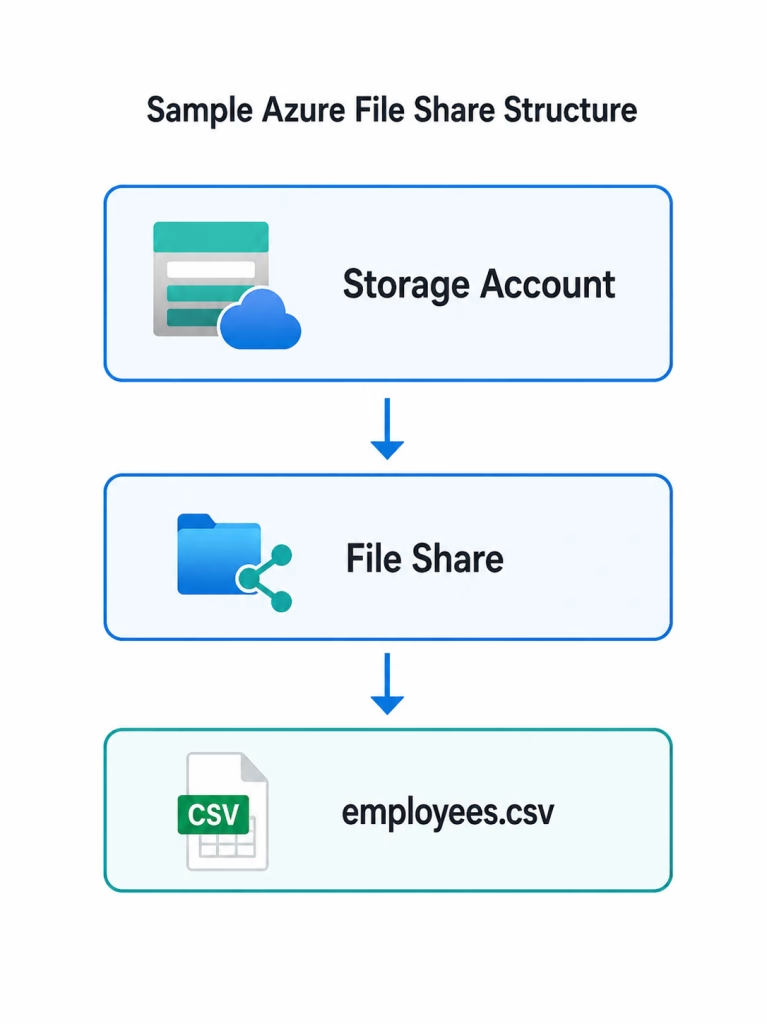
The CSV file should use consistent headers and contain the employee attributes required for provisioning.
Example fields may include:
| CSV Field | Description |
|---|---|
| EmpID | Unique employee identifier |
| First | Employee given name |
| Last | Employee surname |
| Department | Department or business unit |
| Job Desc | Employee title |
| Status | Active or inactive status |
| Hired Date | Employee start date |
Step 2 – Convert the CSV Data into JSON
Azure Logic Apps can read the CSV file from Azure Storage, but working with raw CSV content directly inside a workflow can get messy. To make the workflow easier to process, this solution uses a CSV2JSON Converter Azure Function.
The CSV2JSON Converter reads the CSV file content and returns each row as a structured JSON object. Once the data is in JSON format, the Logic App can loop through each employee record and build the provisioning payload for Microsoft Entra.
For example, the HR export may start as a CSV file like this:

The CSV2JSON Converter transforms it into JSON like this:
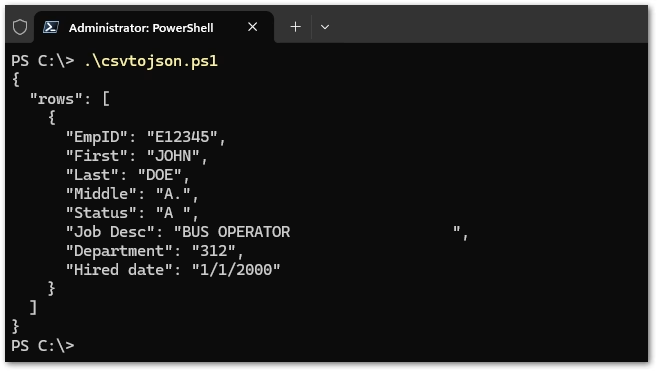
This step is important because the rest of the Logic App depends on being able to parse and loop through structured employee records.
Configuration steps:
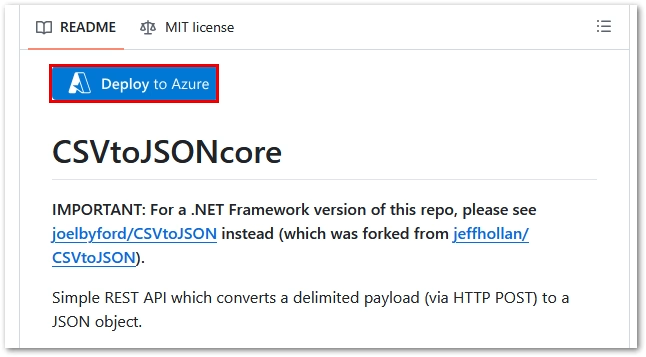
- Navigate to https://github.com/joelbyford/CSVtoJSONcore
- Click “Deploy to Azure” button to install the CSV2JSON Converter Azure Function
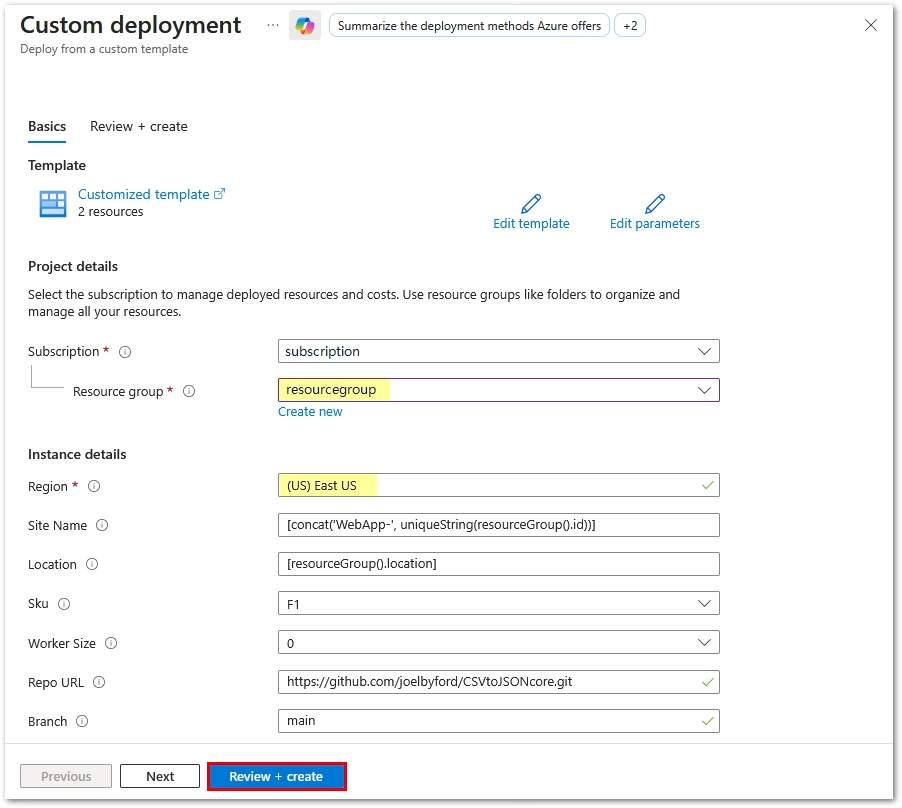
- Ensure the same Resource Group and Region are selected as in previous steps
- Confirm the template Azure Function as an App Service deployment succeeds
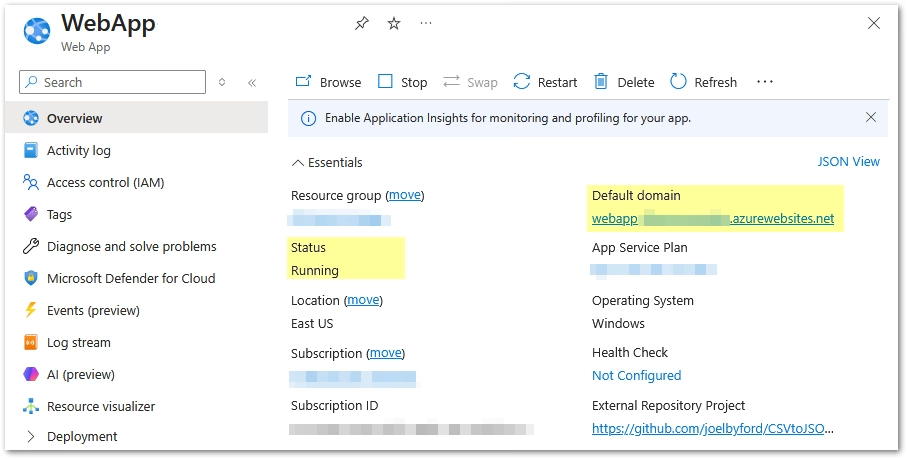
- Navigate to the Resource Group and open the Web App### with the unique name
- Ensure the Status is “Running”
- Copy the function URL or host name under Default Domain
- Navigate to API / CORS and enter an asterisk (*) under Allowed Origins, then “Save”
- Use the PowerShell script to test with sample CSV data, ensuring it outputs in JSON
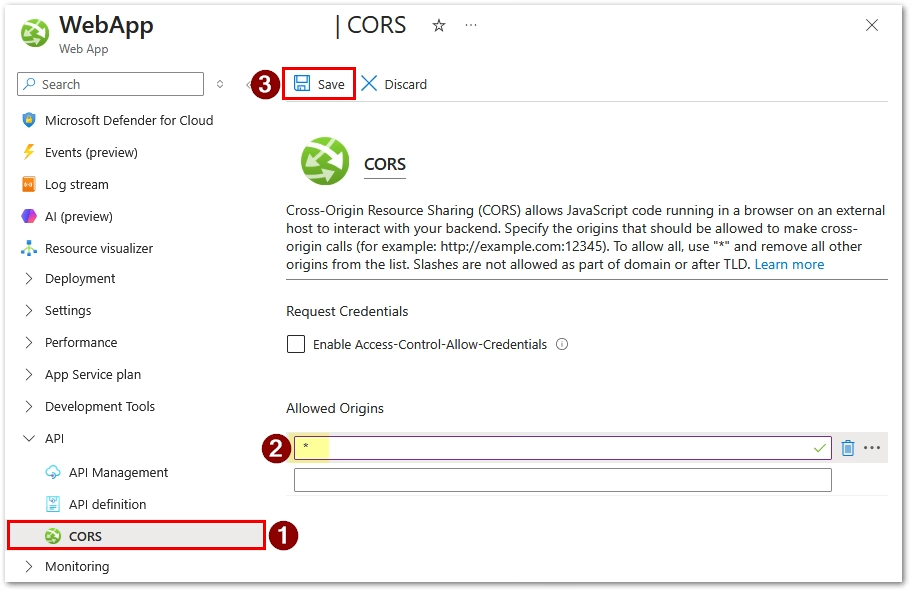
PowerShell script to test CSV conversion
- Copy this PowerShell script below into Notepad or PowerShell ISE
- Change the $csvFilePath line to the actual “employees.csv” location on your machine
- Change the $uri line to “https://webapp-YORWEBAPPURL.azurewebsites.net/csvtojson“
- Save the PowerShell script on your computer as “csvtojson.ps1” in a convenient location
# Step 1: Read the CSV file
$csvFilePath = "C:\employees.csv"
$csvContent = Get-Content -Path $csvFilePath

# Step 2: Set up the request
$uri = "https://webapp-YORWEBAPPURL.azurewebsites.net/csvtojson"
$headers = @{
     "Content-Type" = "text/csv"
}
$body = $csvContent -join "`n"  # Join the CSV lines into a single string

# Step 3: Send the POST request
$response = Invoke-WebRequest -Uri $uri -Method POST -Headers $headers -Body $body

# Output and format the JSON response
$response.Content | ConvertFrom-JSON | ConvertTo-JSON
This is just a test, but once you confirm it’s working, we have validated that the Logic App can treat the HR file as a list of employee records instead of a block of raw text.
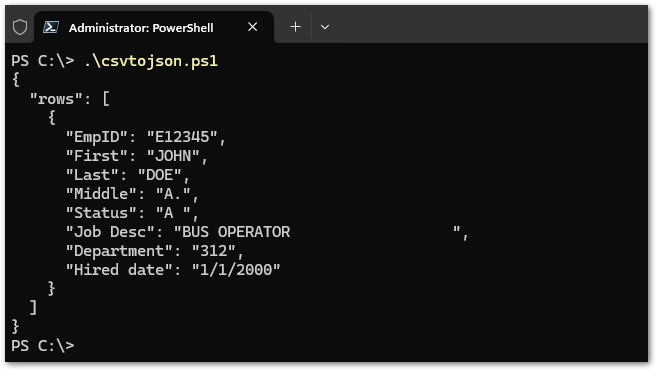
You can copy and paste your JSON content to a Notepad and save it. It will be handy in Step 5 to use a sample payload to validate schema.
Step 3 – Set Up the Inbound Provisioning Enterprise App
Next, configure an API-driven inbound provisioning enterprise application in Microsoft Entra.
This application provides the endpoint that receives the worker data from the Logic App. It also controls how incoming records are matched, mapped, created, and updated.
Configuration steps:
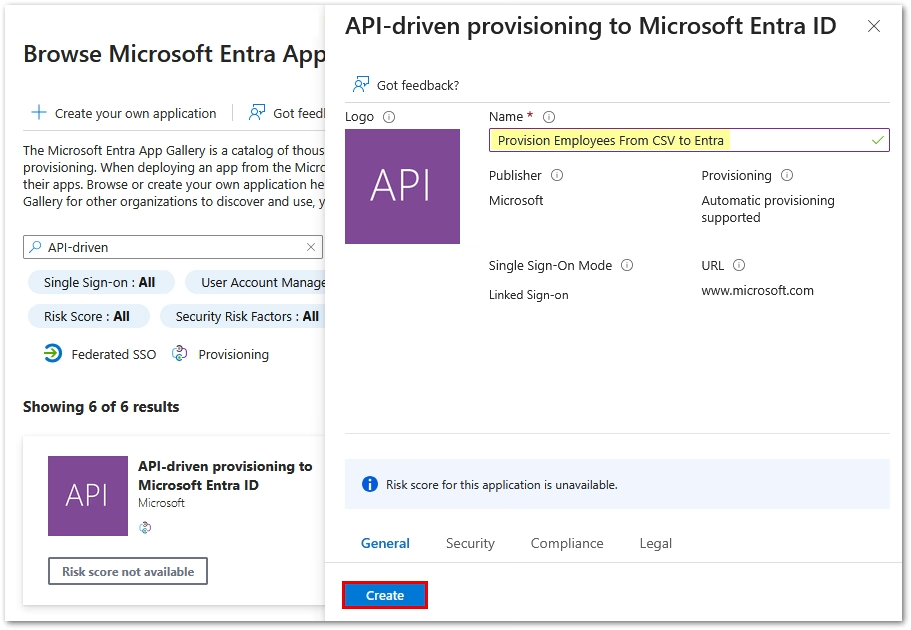
- Navigate to Enterprise Applications and click “New Application”
- Enter “API-driven” in the search field and hit enter
- Choose the provisioning target: Microsoft Entra ID or on-premises Active Directory
- For this guide, we are selecting Entra ID
- Name your app “Provision Employees From CSV to Entra” and click “Create”
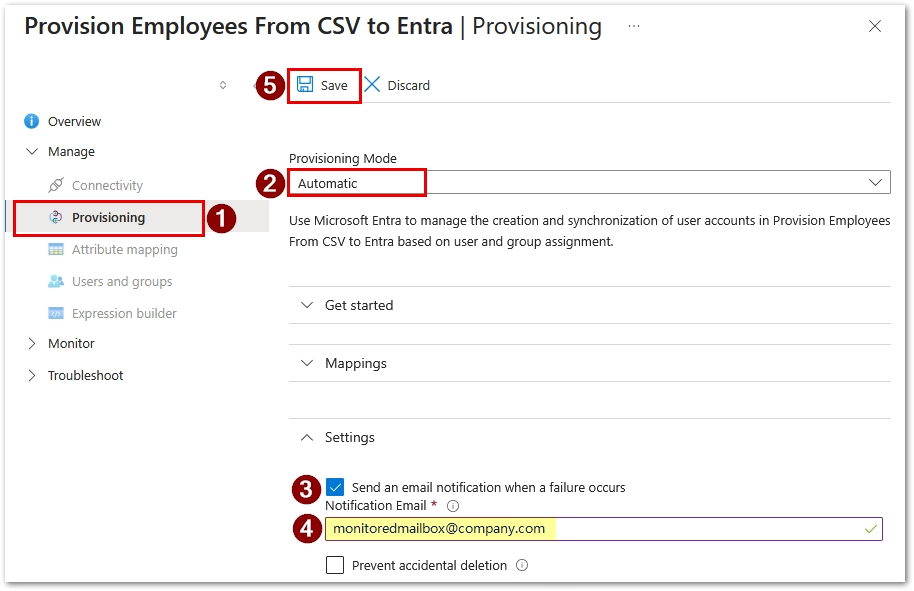
- Once app is created, navigate to Provisioning and set Provisioning Mode to “Automatic” then Save
- Under Settings, select “Send an email…” and enter a monitored mailbox’s email address then Save
- Keep default Attribute Mappings for now (you can edit this later, if needed)
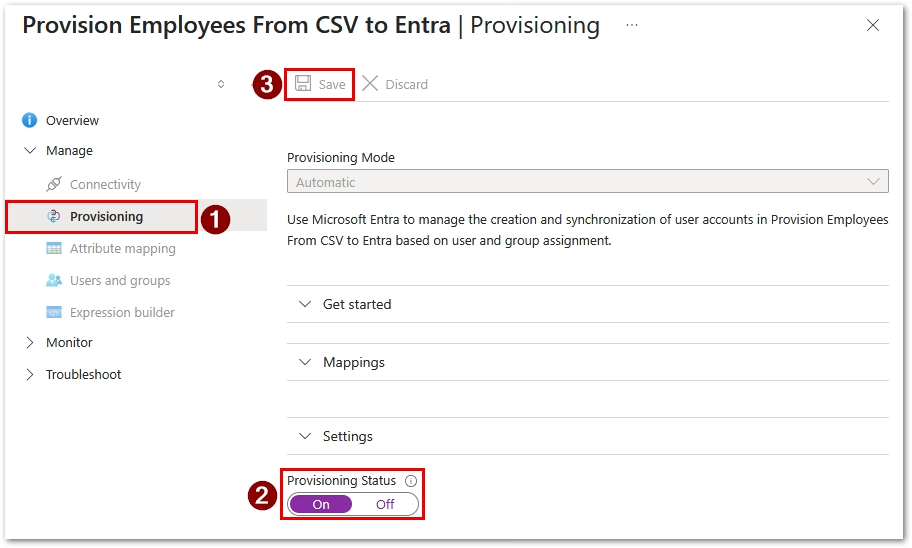
- Under the same Provisioning section, set the Provisioning Status to “On” and Save
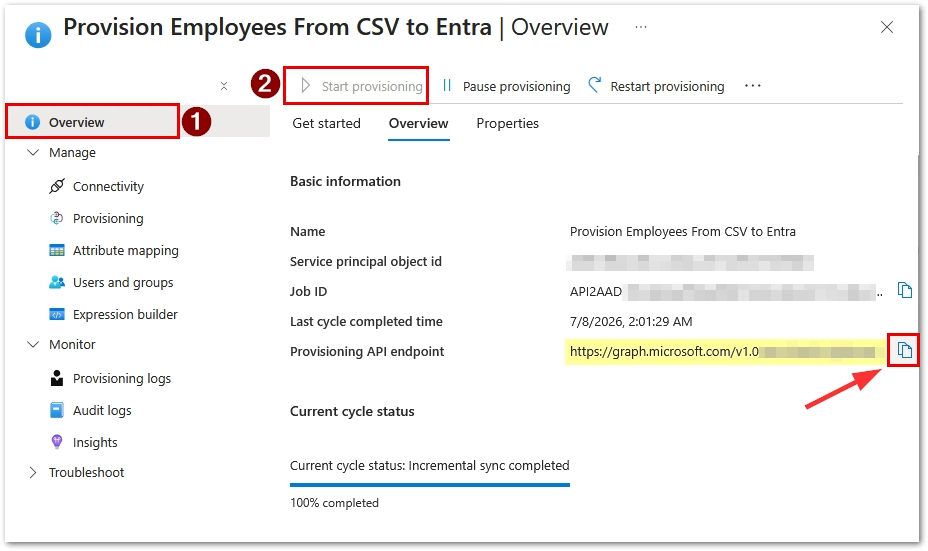
- Go to the Overview page of the app
- If Start Provisioning button is lit up, click on it, then refresh the page
- Under the Overview tab, copy the Provisioning API Endpoint URL
- This is the bulk upload endpoint used by the Logic App
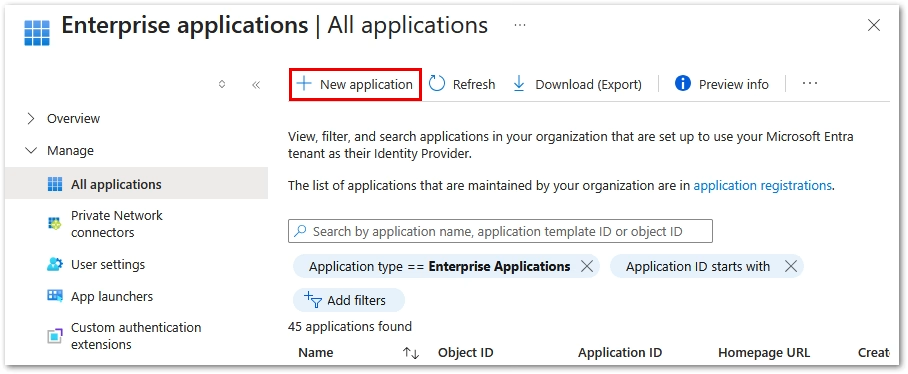
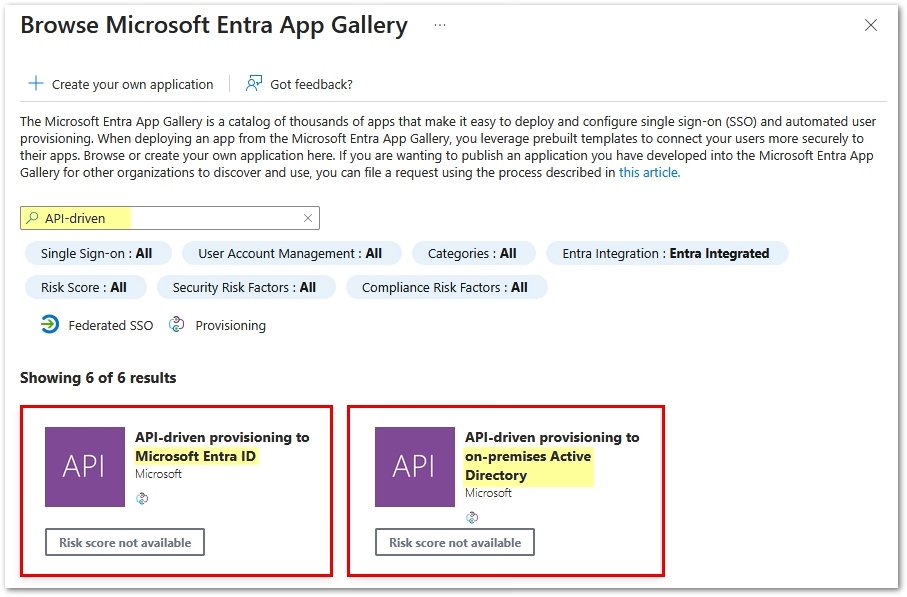
This is the part that makes the solution more than a basic script. The provisioning app becomes the controlled ingestion point for identity data.
Step 4 – Deploy the Logic App and Configure Workflow
The Logic App is the orchestration layer.
It reads the CSV file, calls the CSV-to-JSON function, processes each worker record, builds the SCIM bulk payload, and submits the request to Microsoft Entra.
Configuration steps:
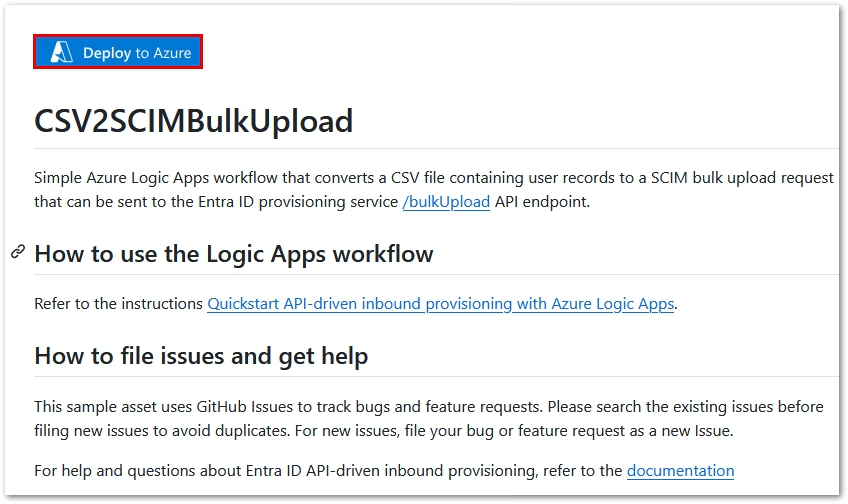
- Navigate to entra-id-inbound-provisioning/LogicApps/CSV2SCIMBulkUpload/readme.md at main · AzureAD/entra-id-inbound-provisioning
- Click the “Deploy to Azure” button to deploy the Azure Logic App workflow
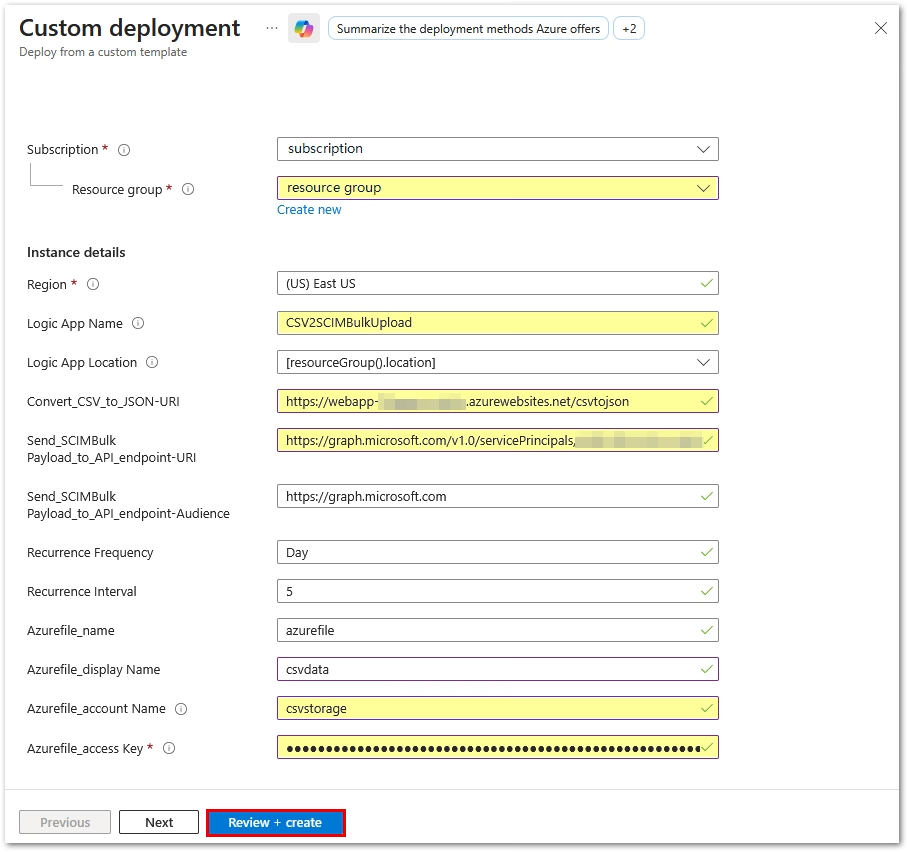
- Ensure the same Resource Group is selected as in previous steps
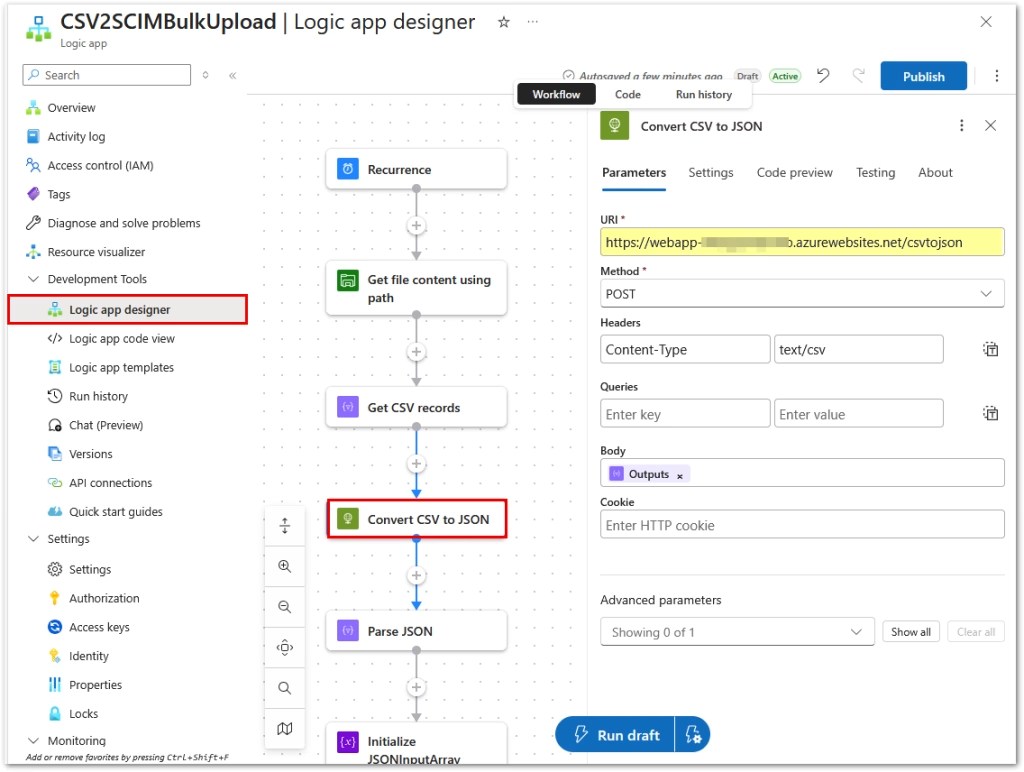
- Populate the Convert_CSV_to_JSON-URI with your WebApp URI from Step 2 under your WebApp
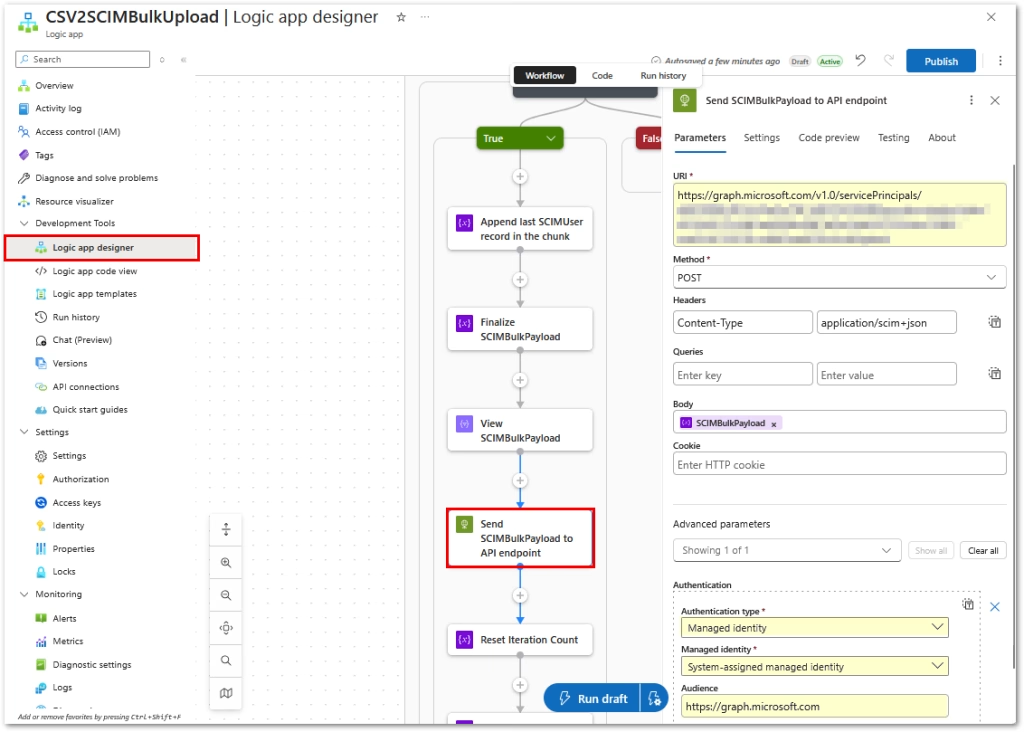
- Populate the Send_SCIMBulk Payload_to_API_endpoint-URI with your Provisioning Endpoint URI from Step 3 under the “Provision Employees From CSV to Entra” Enterprise App Provisioning blade
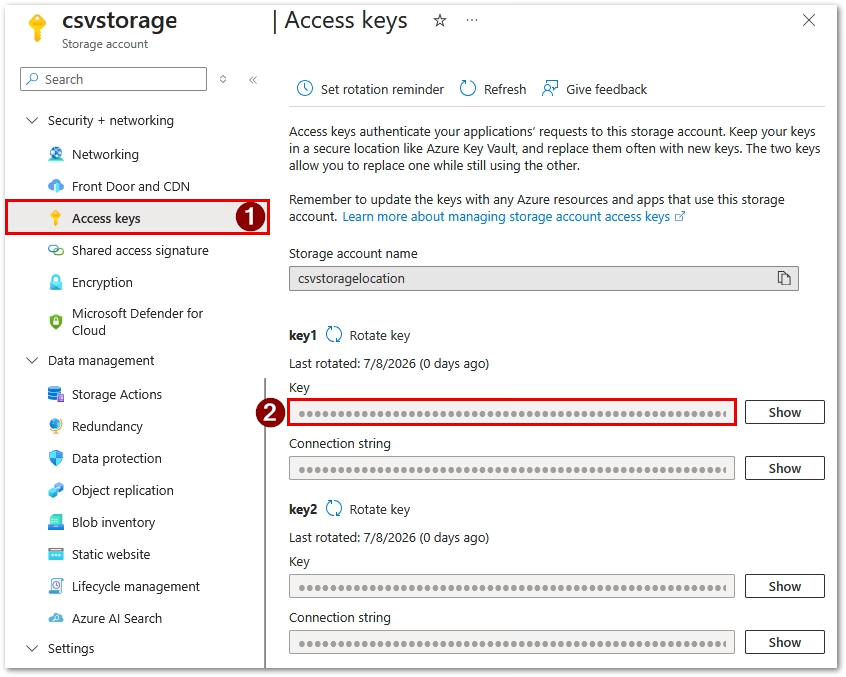
- Populate the Azurefile_access Key from the Azure Storage account, under Security + Networking / Access Keys, Key 1 (click Show) and copy
- Ensure the Azure_account Name matches your Azure Storage account name i.e CSVStorage
- Then, click to “Review + Create” the Logic App and click “Create” to complete
- Ensure Deployment is Complete
This design gives you a repeatable process that can run manually during testing and later be scheduled for production use.
Step 5 – Configure a System Assigned Managed Identity
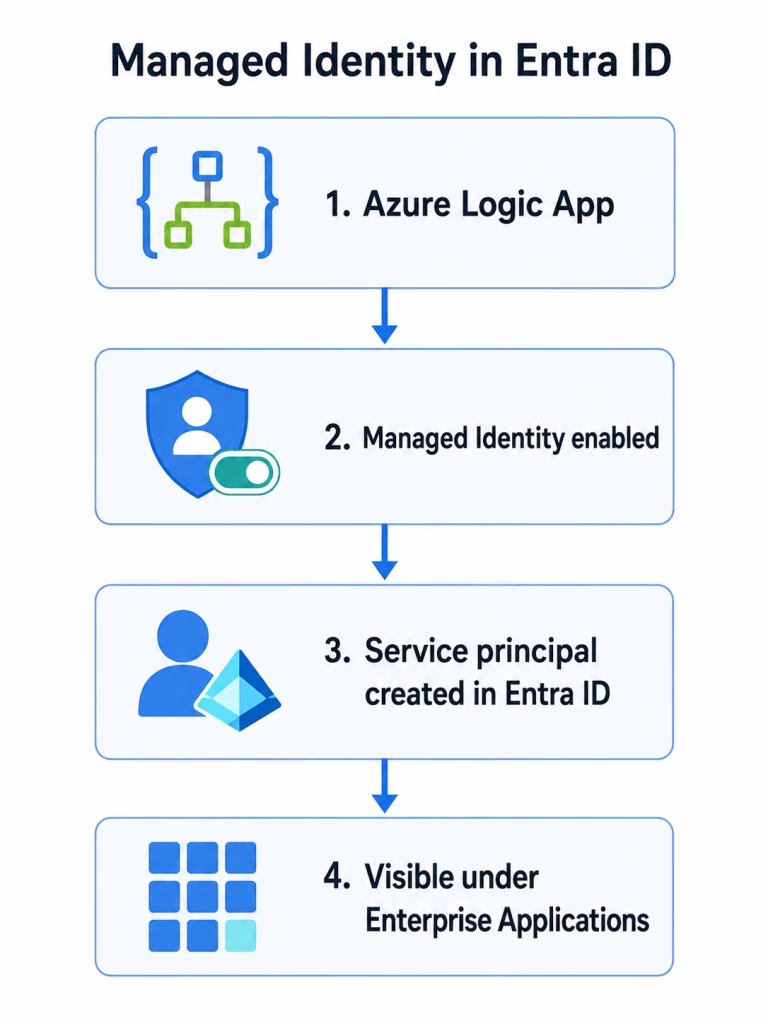
To securely call the provisioning endpoint, enable a system-assigned Managed Identity on the Logic App.
Using managed identity avoids storing credentials directly in the workflow and provides a cleaner security model.
Once enabled, grant the Managed Identity the permissions required to call the inbound provisioning API.
This keeps the integration tied to the Logic App resource instead of a shared user account or long-lived secret.
A Managed Identity is the identity assigned to an Azure resource.
An Enterprise Application is where that identity appears in Microsoft Entra ID as a service principal.
Configuration steps:
- Under the Logic App from previous step, navigate to Identity / Set Status to On
- If prompted to confirm the use of the managed identity, select Yes
- Run the PowerShell script below from your machine to enable the permissions for the managed identity (do not modify the script)
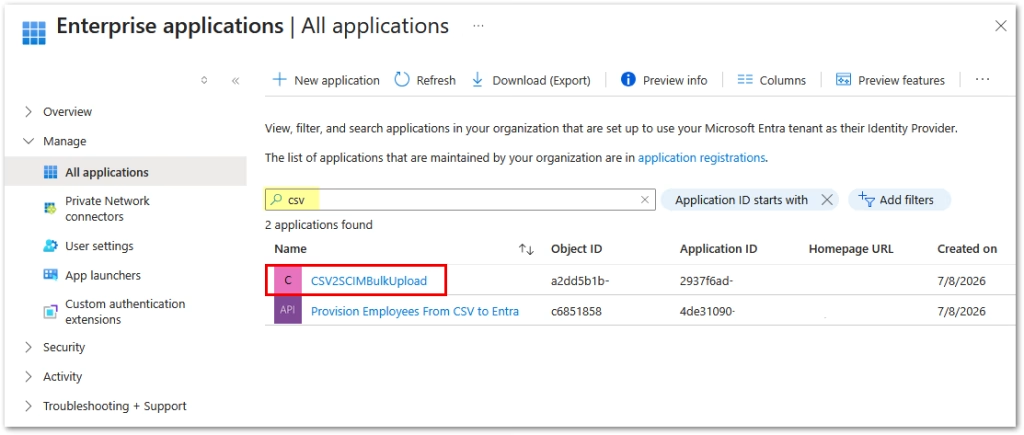
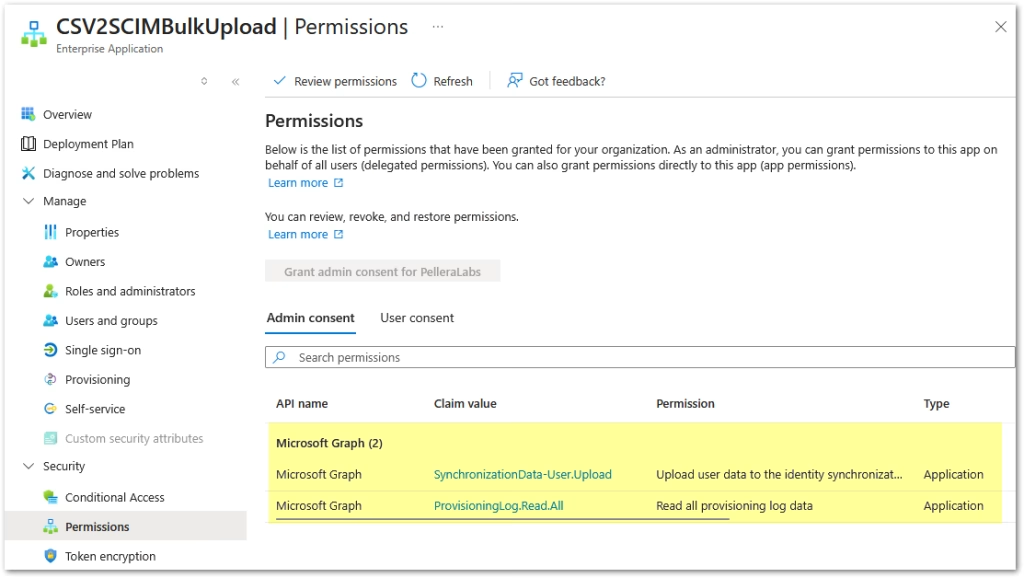
- Validate permissions applied successfully
- Find the managed identity service principal under Enterprise Applications in Microsoft Entra ID.
- Remove the Application type filter to see all service principals.
Install-Module Microsoft.Graph -Scope CurrentUser

Connect-MgGraph -Scopes "Application.Read.All","AppRoleAssignment.ReadWrite.All,RoleManagement.ReadWrite.Directory"
$graphApp = Get-MgServicePrincipal -Filter "AppId eq '00000003-0000-0000-c000-000000000000'"

$PermissionName = "SynchronizationData-User.Upload"
$AppRole = $graphApp.AppRoles | Where-Object {$_.Value -eq $PermissionName -and $_.AllowedMemberTypes -contains "Application"}
$managedID = Get-MgServicePrincipal -Filter "DisplayName eq 'CSV2SCIMBulkUpload'"
New-MgServicePrincipalAppRoleAssignment -PrincipalId $managedID.Id -ServicePrincipalId $managedID.Id -ResourceId $graphApp.Id -AppRoleId $AppRole.Id

$PermissionName = "ProvisioningLog.Read.All"
$AppRole = $graphApp.AppRoles | Where-Object {$_.Value -eq $PermissionName -and $_.AllowedMemberTypes -contains "Application"}
$managedID = Get-MgServicePrincipal -Filter "DisplayName eq 'CSV2SCIMBulkUpload'"
New-MgServicePrincipalAppRoleAssignment -PrincipalId $managedID.Id -ServicePrincipalId $managedID.Id -ResourceId $graphApp.Id -AppRoleId $AppRole.Id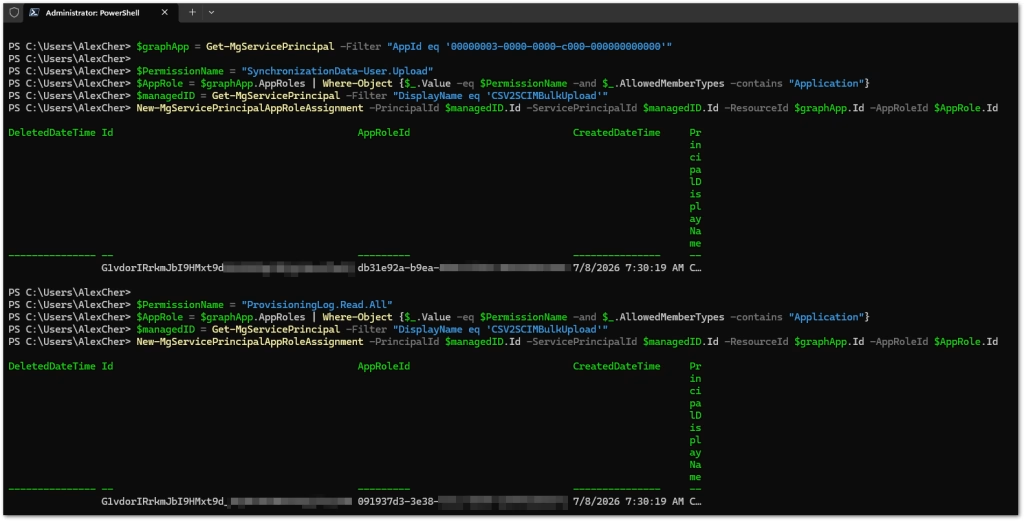
Step 6 – Map HR Fields to Provisioning Attributes
The most important part of the workflow is the attribute transformation.
Each field from the HR export needs to be mapped to the correct SCIM or Microsoft Entra attribute.
Example mapping:
| HR CSV Field | Target Attribute |
|---|---|
| EmpID | employeeNumber / employeeId |
| First | name.givenName |
| Last | name.familyName |
| Job Desc | title |
| Department | department |
| Status | active |
| Hired date | employeeHireDate or extension attribute |
This is also where you define your logic for account status.
For example:
If Status = Active
    active = true

If Status = Terminated
    active = false
You can also add logic for future-dated hires, missing required fields, naming conventions, and duplicate employee IDs.
Configuration steps:
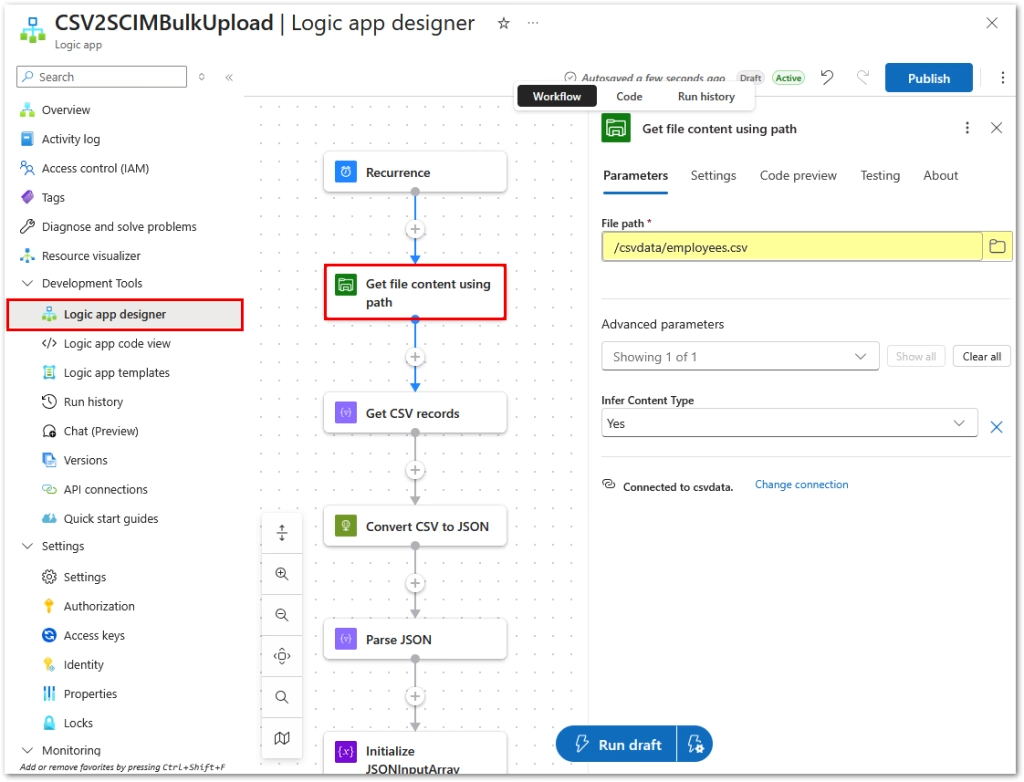
- Open the CSV2SCIMBulkUpload Logic App
- Click on Development Tools / Logic App Designer
- Click on “Get file content using path” and update the File Path to your CSV file
- Click on “Convert CSV to JSON” step and ensure it is pointing to the right Azure Function Web App
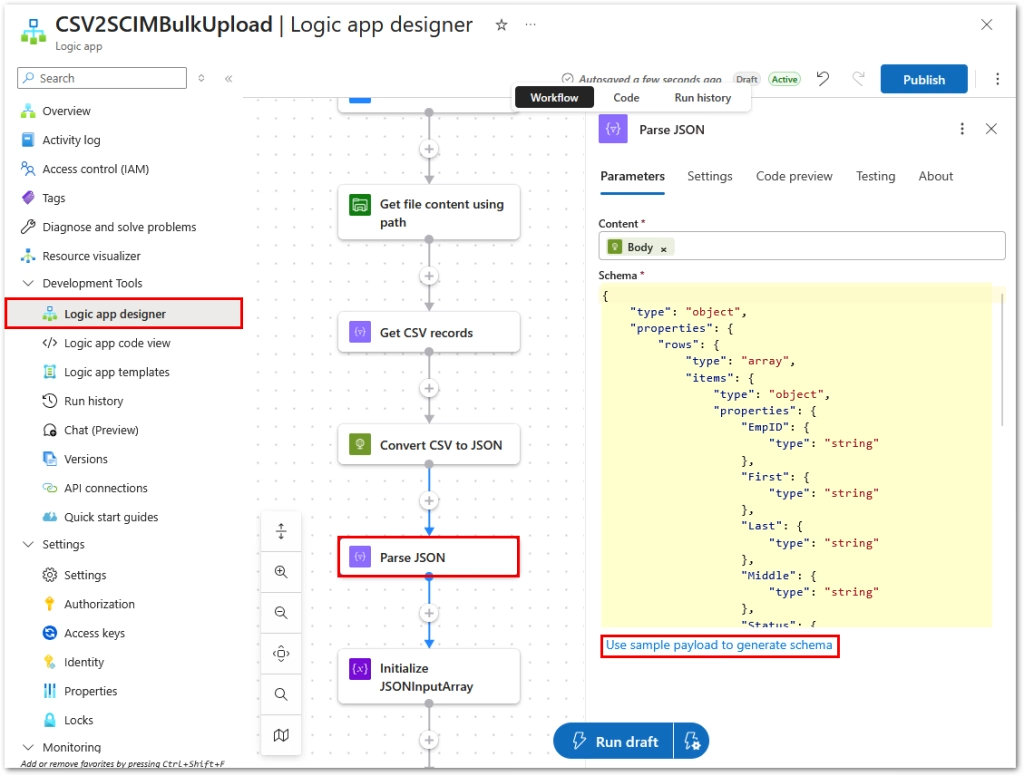
- Click on “Parse JSON” and click “Use a sample payload to generate schema”
- Use the JSON file which was a conversion from CSV from Step 2 to upload here to match structure
- Expland bottom “For Each” loop and click on “Contruct SCIMUser”
- Modify the Parameters Inputs to match the JSON/CSV structure either manually or download this construct_scimuser.json file below. Paste the Inputs.
- Finally, verify Parameters for “Send SCIMBulkPayload to API endpoint” to ensure URI matches your API Endpoint and authentication structure. Click Publish.
Parameters Inputs JSON file for “Construct SCIMUser” Connector:
Parameters Inputs JSON code for “Construct SCIMUser” Connector:
{
  "bulkId": "@{guid()}",
  "data": {
    "schemas": [
      "urn:ietf:params:scim:schemas:core:2.0:User",
      "urn:ietf:params:scim:schemas:extension:enterprise:2.0:User"
    ],
    "active": @{equals(items('For_each')?['Status'], 'A')},
    "displayName": "@{concat(items('For_each')?['First'], ' ', items('For_each')?['Last'])}",
    "externalId": "@{items('For_each')?['EmpID']}",
    "name": {
      "familyName": "@{items('For_each')?['Last']}",
      "givenName": "@{items('For_each')?['First']}"
    },
    "nickName": "@{items('For_each')?['EmpID']}",
    "title": "@{items('For_each')?['Job Desc']}",
    "userName": "@{items('For_each')?['EmpID']}",
    "urn:ietf:params:scim:schemas:extension:enterprise:2.0:User": {
      "department": "@{items('For_each')?['Department']}",
      "employeeNumber": "@{items('For_each')?['EmpID']}"
    }
  },
  "method": "POST",
  "path": "/Users"
}
Step 7 – Run Trigger to Submit the Provisioning Request
After the SCIM payload is built, the Logic App submits it to the API-driven inbound provisioning endpoint.
Configuration steps:
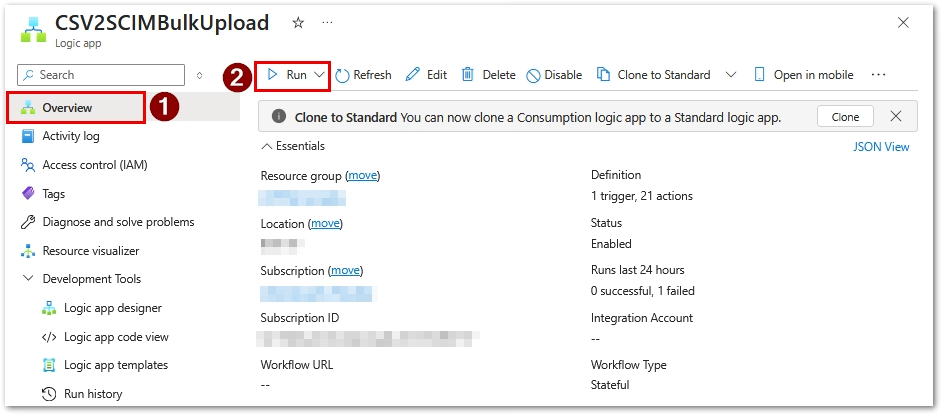
- Navigate to the CSV2SCIMBulkUpload Logic App
- Go to Overview section
- Click Run and Run Trigger
- Go to Run History and check last run
- You should see a green checkbox for a successful run
- Look at Send SCIMBulkPOayload to API Endpoint, under Outputs look for Status Code: 202. Success!
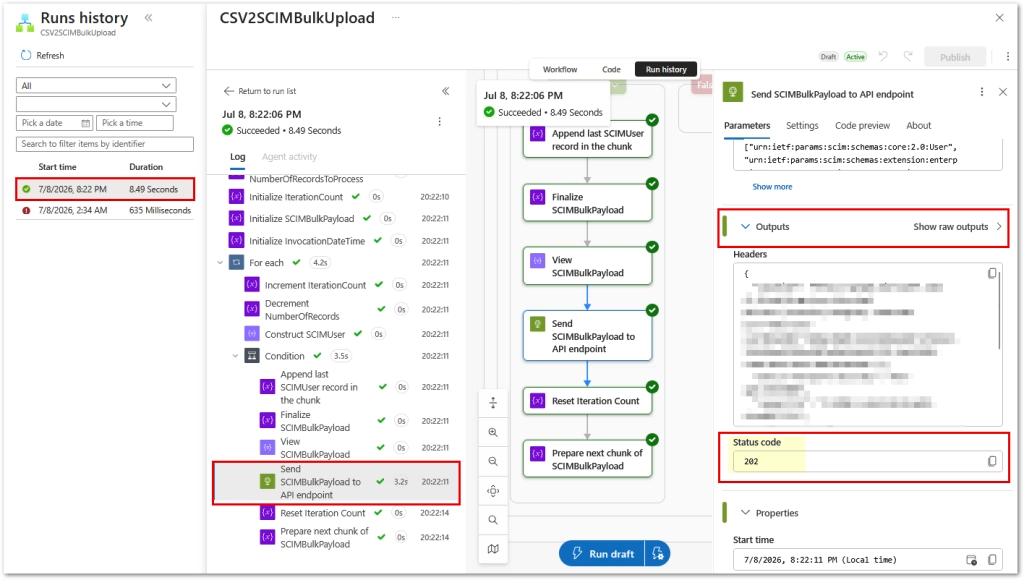
A successful submission means the request was accepted by the provisioning API. It does not always mean every user was successfully created, so monitoring is still required.
Step 8 – Validate the Provisioning Results
After running the workflow, validate the results in both Azure and Microsoft Entra.
Check the Provisioning logs in Azure Enterprise App, then check Microsoft Entra Users blade for successful user provisioning.
Configuration steps:
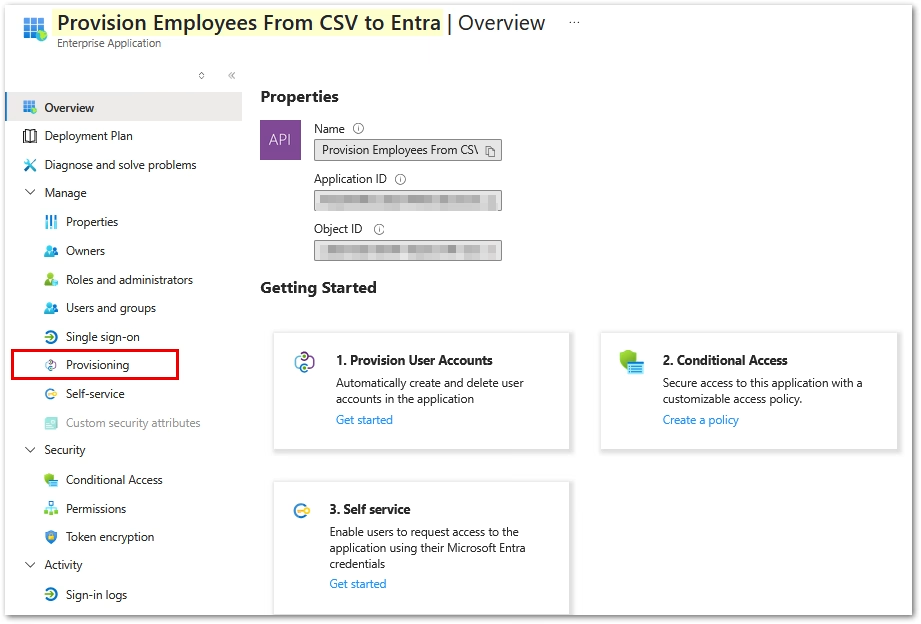
- Open the “Provision Employees From CSV to Entra” Enterprise App
- Click on Provisioning blade under Manage
- Under Monitor, click on Provisioning Logs blade
- Select the most recent log after the Logic App run and review for Result “Success”
- Then navigate to Entra portal and select Users
- Search for the user’s name under Users and validate that it exists.
- Open it and verify Properties.
- If all looks good – congratulations. You have automatically provisioned a user!
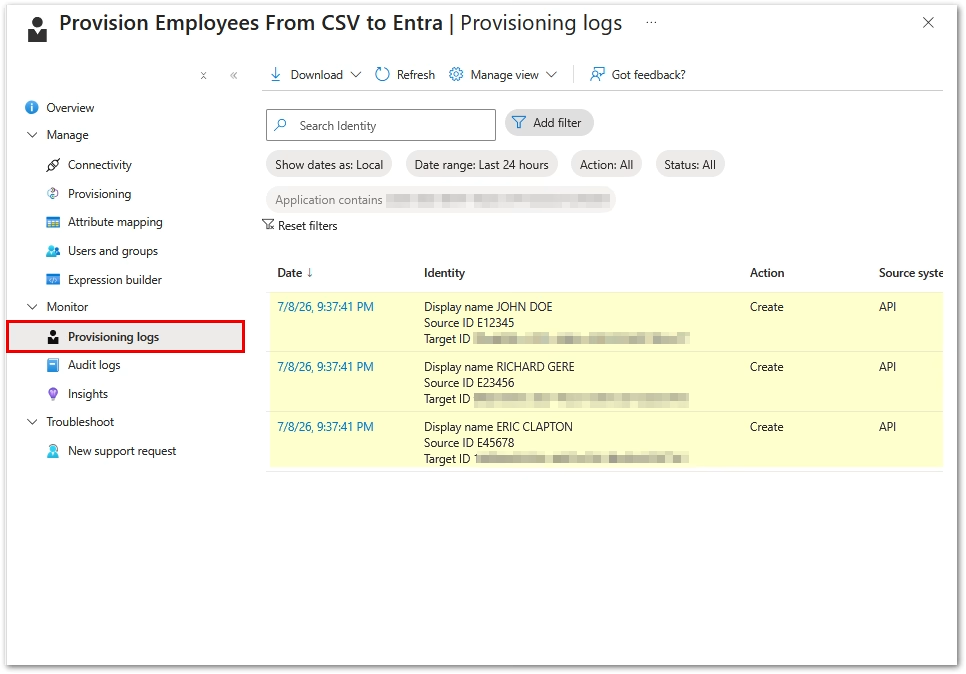
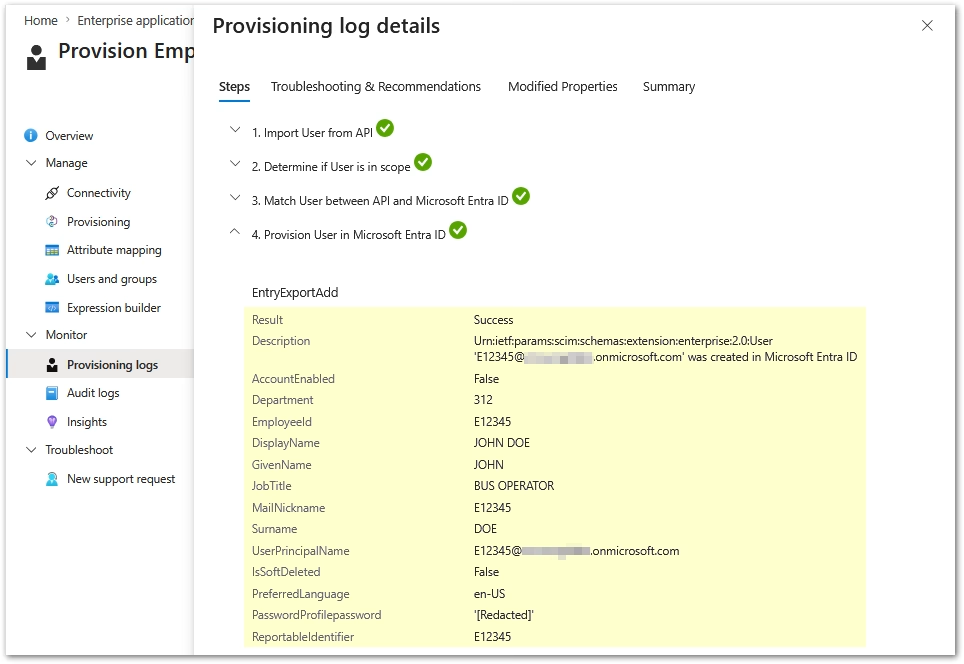
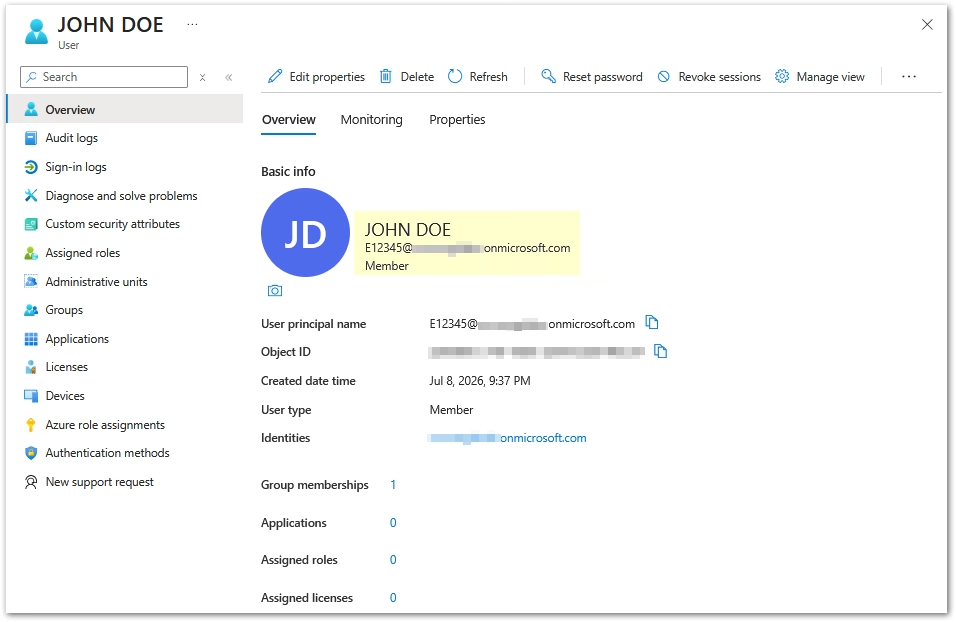
This is where you confirm whether the integration is working end to end.
A clean test should show the CSV file being read, converted, transformed, submitted, and processed by the provisioning service.
Step 9 – Add Lifecycle Workflows (Optional)
Once the user account exists, Microsoft Entra ID Governance can take over the lifecycle side. This is where the Entre ID Governance license comes into play.
Lifecycle Workflows can be used to automate onboarding and offboarding tasks such as:
- Sending welcome emails
- Generating Temporary Access Passes
- Adding users to groups
- Assigning birthright access
- Notifying managers
- Triggering custom Logic App tasks
- Disabling access during offboarding
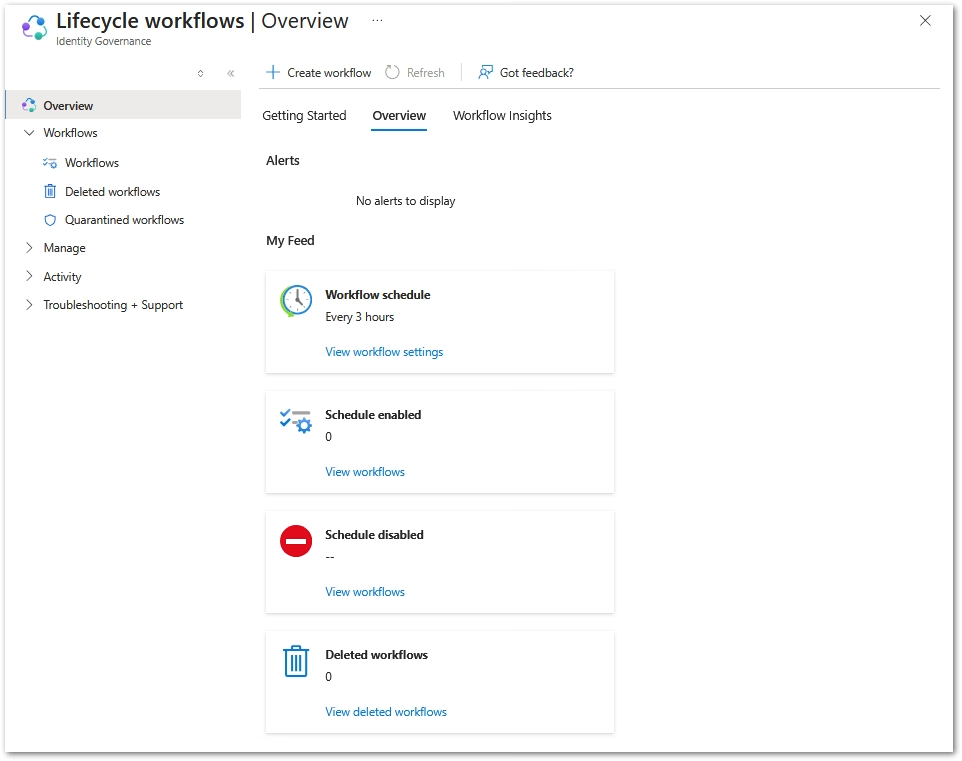
This is where the solution starts to feel like a practical IGA workflow instead of just file-based account creation.
Step 10 – Operationalize the Process
Before using this in production, add the controls you would expect in a real provisioning process.
Recommended additions include:
- Separate test and production file shares
- Input validation
- Duplicate employee ID checks
- Required field checks
- Logging and alerting
- Failed record handling
- Processed file archiving
- Change control for attribute mappings
- Least-privilege permissions
- Monitoring for provisioning failures
The goal is not just to make the first user provision successfully. The goal is to build a process that can run repeatedly, safely, and predictably.
Final Thoughts
This is not the same as having a native HR connector for Workday or SAP SuccessFactors. It is a practical integration pattern for organizations that need HR-driven provisioning but rely on systems that export worker data through CSV files or custom interfaces.
By combining Azure Logic Apps, an Azure Function, API-driven inbound provisioning, and Microsoft Entra ID Governance, you can build a flexible onboarding workflow that connects almost any HR source to Active Directory or Microsoft Entra ID.
References
- Microsoft Entra application provisioning overview
https://learn.microsoft.com/en-us/entra/identity/app-provisioning/user-provisioning - API-driven inbound provisioning with Azure Logic Apps
https://learn.microsoft.com/en-us/entra/identity/app-provisioning/inbound-provisioning-api-logic-apps#step-1-create-an-azure-storage-account-to-host-the-csv-file - Grant access to the inbound provisioning API using a managed identity
https://learn.microsoft.com/en-us/entra/identity/app-provisioning/inbound-provisioning-api-grant-access#configure-a-managed-identity - Create an API-driven inbound provisioning app
https://learn.microsoft.com/en-us/entra/identity/app-provisioning/inbound-provisioning-api-configure-app#create-your-api-driven-provisioning-app - Microsoft Entra API-driven inbound provisioning walkthrough video
https://www.youtube.com/watch?v=_ZjARPpI6NI
Found this useful? Share with others: