Promote Entra Connect Sync Staging to Active
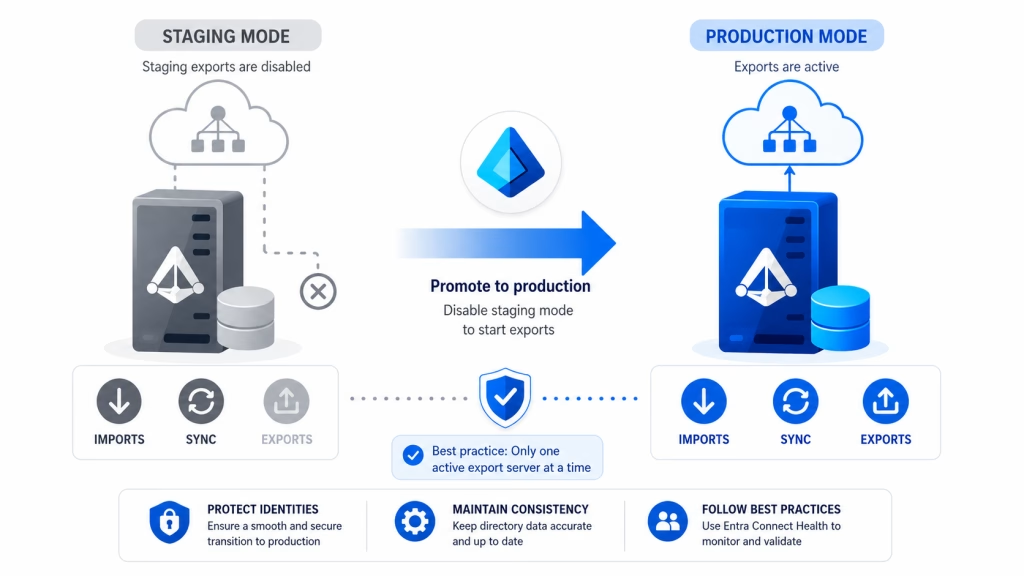
So, you have a Microsoft Entra Connect Sync server running in staging mode and you are ready to make it production. Now what?
The most important rule is to avoid having two Entra Connect servers actively exporting changes at the same time. Microsoft’s guidance is that only one server should be active for exports. The staging server can still import and synchronize data, but it does not export changes to Microsoft Entra ID until staging mode is disabled.
This guide walks through the safe cutover process: validate the staging server, review pending exports, place the current production server into staging mode, activate the new server, and confirm sync health after the switchover.
Switchover Steps
Prerequisites:
- Staging server already completed: Full Import, Full Synchronization, No unexpected pending exports
- Same Entra Connect version on both servers is preferred.
- Custom sync rules/configuration already migrated to staging server if applicable.
Permission requirements:
- Enterprise Administrator in AD or local administrator role on Windows servers
- Hybrid Identity Administrator or Global Admin in Entra ID
Step 1: Manually update configuration changes from current production server
- Export configuration from both servers from the configuration wizard
- Compare them side by side in Notepad++
- Look for differences (i.e. new OUs selected for sync on production that weren’t updated on staging)
- Update differences manually in the configuration wizard
Step 2: Validate the staging server is healthy
On the current STAGING server:
- Open Microsoft Entra Connect Sync / Synchronization Service
- Review:
• Connectors show successful runs
• No export errors
• No major sync failures - Open “Synchronization Service” and you’ll see:
• Operations
• Connectors
• Metaverse Search - Go to “Connectors” and check the Microsoft Entra ID connector FIRST
- Double-click: Your Entra connector (usually named something like: tenant.onmicrosoft.com – AAD)
- Click “Search Connector Space”
- Set: Scope = Pending Export
- Click Search
- Now you’ll see EVERYTHING the staging server wants to export once activated.
Review Before Disabling Staging Mode
Before taking the staging server out of Staging mode, review the pending exports carefully. The goal is not necessarily to see zero changes. In most environments, it is normal to see some pending updates waiting to export.
What you want to see is a small number of changes that are easy to explain, such as:
- Recent password hash sync activity
- New users, groups, hires, or terminations you recognize
- Small group membership changes
- Minor user or group attribute updates
A healthy pending export should look boring. Seeing 5, 10, or 20 expected updates is usually fine if you can explain what they are and why they are there.
The real concern is a large or unexplained export. Do not disable staging mode if you see things like:
- Hundreds or thousands of deletes
- Many users marked for deletion
- Groups unexpectedly disappearing
- Every user or group being modified
- Large changes to attributes such as
proxyAddresses
Those types of changes usually mean something does not match between the production and staging servers. Common causes include incorrect OU filtering, domain filtering differences, connector mismatches, custom sync rule differences, sourceAnchor issues, or general configuration drift.
Group writeback deserves extra attention, especially in environments that use Cloud Sync, Group SOA, or group writeback. Watch for unexpected group deletes, groups moving to different OUs, distinguished name changes, or cloud-managed groups exporting back on-premises when you did not expect them to.
The main rule is simple: do not disable staging mode until the pending exports make sense. A small number of known, explainable updates is normal. A large number of unexplained deletes or broad changes is a reason to stop.
How to inspect an individual pending export
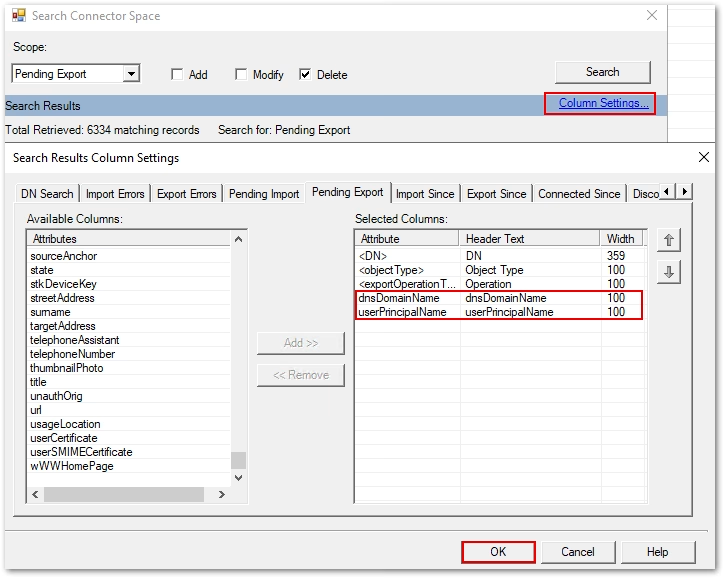
- Customize the Connector Space view by adding additional columns:
- DisplayName
- dnsDomainName
- userPrincipalName
- Double-click an object.
- Review:
- Distinguished Name
- Pending Export Type
- Attribute changes
- Look for:
- Add
- Update
- Delete
- Then inspect attribute-level changes. Example, if you see:
proxyAddressesdisplayNamememberOf- Make sure the values look correct.
- The MOST important thing to check is deletes. In Connector Space search:
- Set:
- Scope = Pending Export
- Object Type = person/group
- State = delete
- If you see:
- Zero deletes -> usually great
- Few expected deletes -> probably fine
- Many deletes -> STOP and investigate
- Set:
PowerShell alternative (advanced)
- Open PowerShell in Administrator mode
- Use
csexport.exeto dump pending exports. - Then inspect XML for
- Delete operations
- Bulk modifications
PowerShell command:
Substitute the csexport.exe location for the location on your server.
& "C:\Program Files\Microsoft Azure AD Sync\Bin\csexport.exe" `
"tenant.onmicrosoft.com - AAD" `
C:\Temp\PendingExports.xml /f:x
Safe Promotion Rule
Before disabling staging mode, make sure the pending exports are expected, explainable, and consistent with normal production activity.
At a minimum, you should be able to validate the following:
- Every pending delete is understood
- Any large change set has a clear explanation
- OU filtering matches the current production server
- Sync rules match the current production server
- Connector configuration matches the current production server
If the pending exports look close to what you would normally expect from day-to-day production sync activity, you are usually in good shape. If you see unexpected deletes, broad attribute changes, or anything you cannot explain, stop and investigate before promoting the staging server.
Increase the Deletion Threshold, If Needed
Microsoft Entra Connect has accidental delete protection enabled by default. If more than 500 objects are staged for deletion, the export will stop until the deletion threshold is increased.
Do not treat this as something to bypass automatically. First, confirm the deletes are expected and understood. This may be valid after an intentional OU filtering change, domain scoping change, or cleanup activity.
If the deletes are valid and exceed the default threshold, temporarily increase the limit from the Entra Connect server using PowerShell. This requires Hybrid Administrator permissions.
After the export completes, return the threshold to your normal value.
PowerShell command:
Get-ADSyncExportDeletionThreshold

Enable-ADSyncExportDeletionThreshold -DeletionThreshold 1000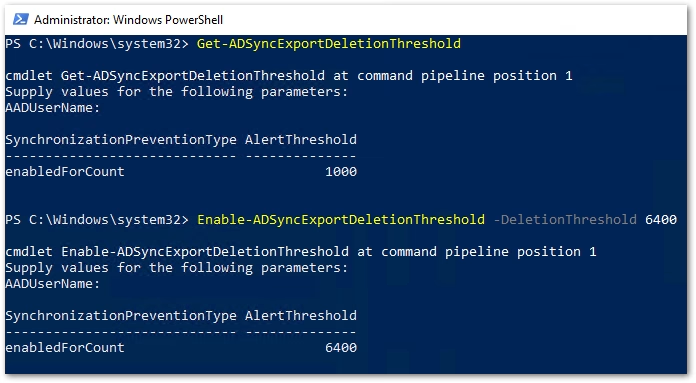
Step 3: Put the current production server into staging mode
On the CURRENT PRODUCTION Entra Connect server:
- Open: Microsoft Entra Connect
- Click: Configure
- Select: Configure staging mode
- Authenticate to Entra ID
- CHECK: Enable staging mode
- Click Configure button to set server to staging mode
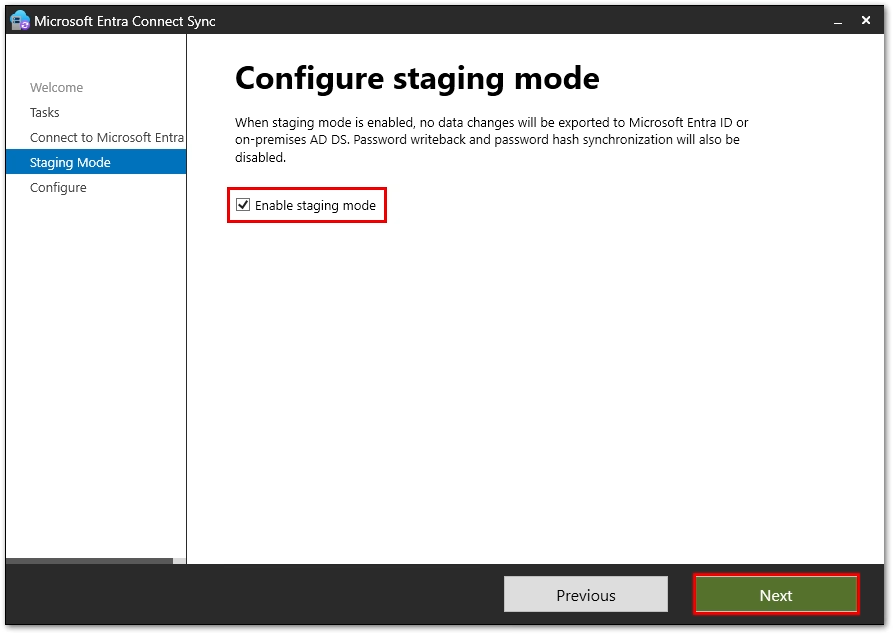
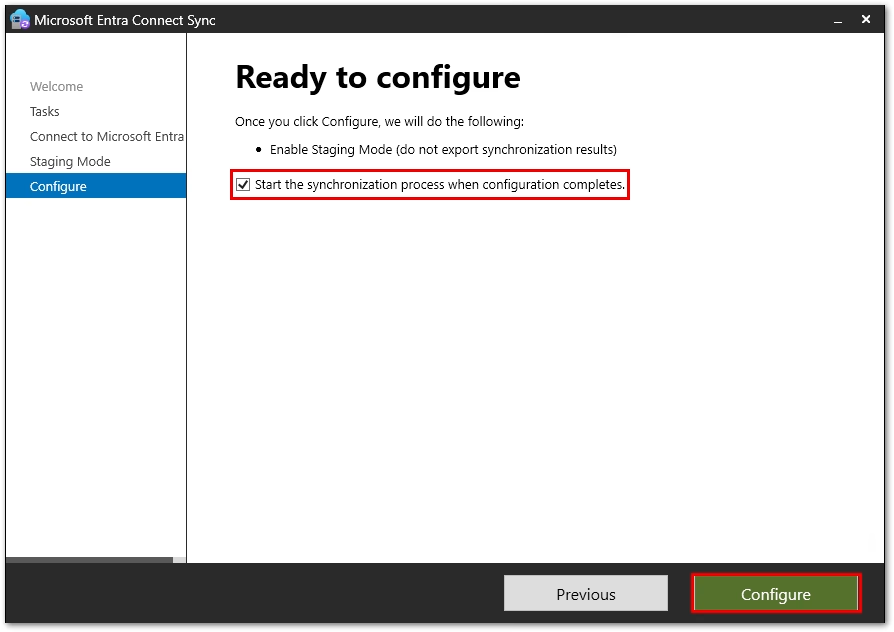
Clicking Configure disables exports from the current production server.
Important: Only One Server Should Export
Before promoting the new staging server to production, place the current production server into staging mode.
You do not want two active production servers simultaneously. There should only be one active sync/export server at a time.
Step 4: Verify old server is truly passive
On the FORMER PRODUCTION server run this:
PowerShell command:
$ADSyncSettings = Get-ADSyncGlobalSettings

($ADSyncSettings.parameters | Where-Object {$_.Name -eq "Microsoft.Synchronize.StagingMode"}).Value
Expected result: True
True = staging mode enabled.
False = production mode enabled.
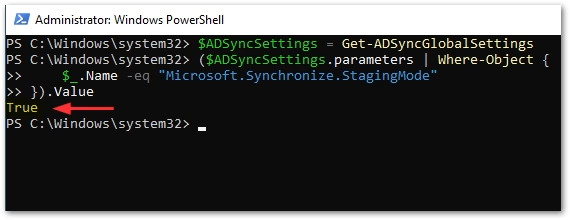
PowerShell command (alternative option #1):
Get-ADSyncSchedulerExpected result: StagingModeEnabled : True
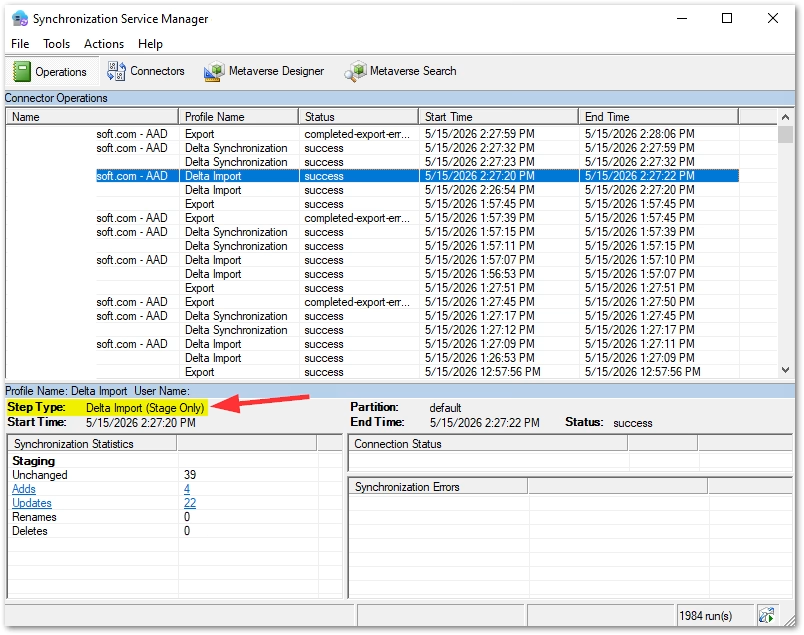
Verify with Synchronization Service Manager (alternative option #2)
- Open Synchronization Service Manager
- Click on Operations
- Select Connector yourtenant.onmicrosoft.com – AAD / Delta Import
- Look for Step Type: Delta Import (Stage Only)
- Exports should stop running at this point
Step 5: Activate the staging server
Now switch to the NEW STAGING server that you want to activate:
- Open: Microsoft Entra Connect
- Click: Configure
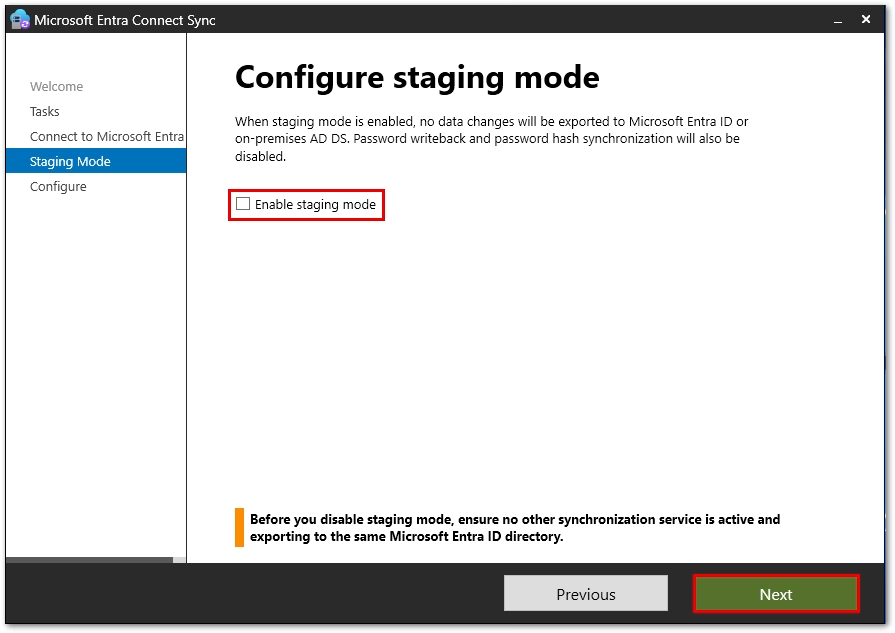
- Select: Configure staging mode
- Authenticate
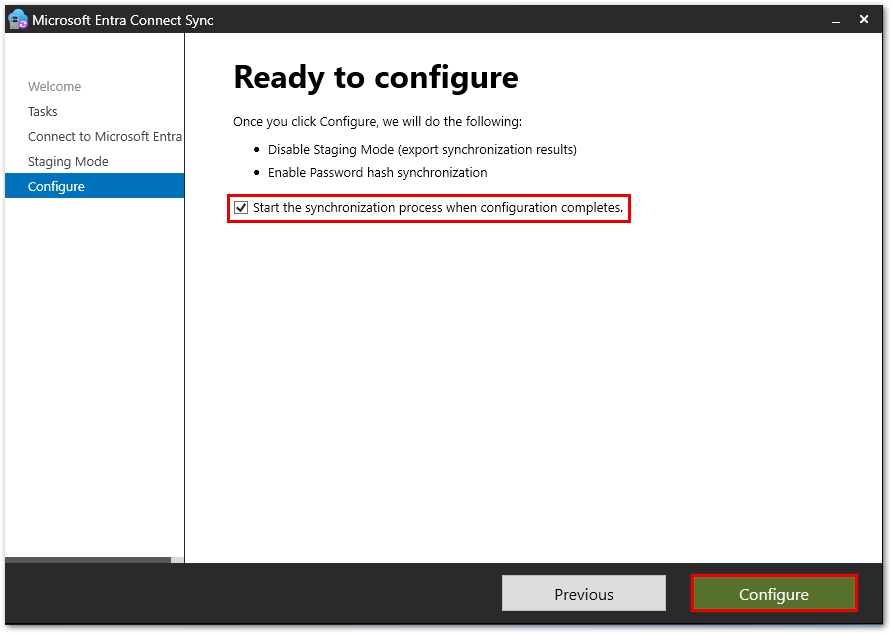
- UNCHECK: Enable staging mode
- Optionally check: Start synchronization process when configuration completes
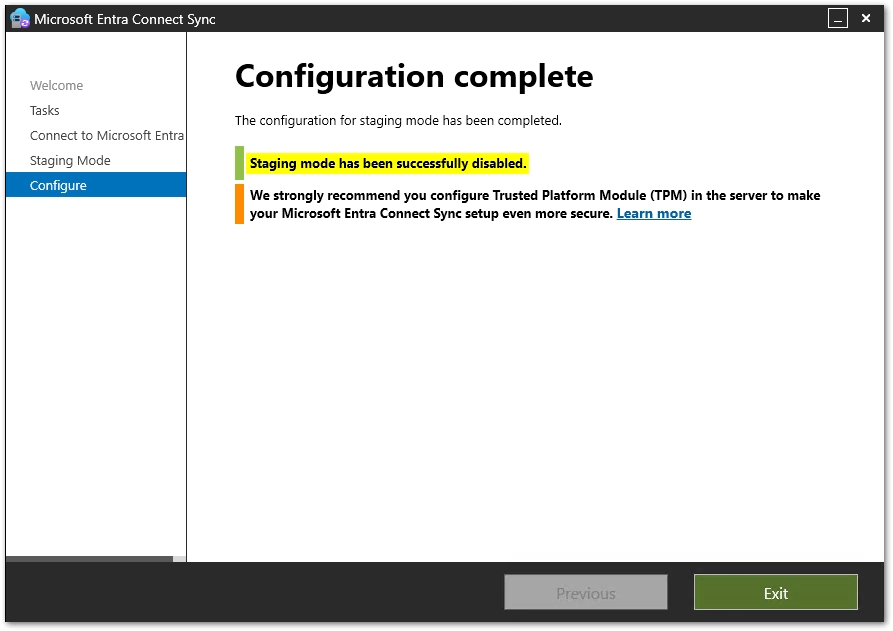
- Finish wizard
- This server is now the ACTIVE PRODUCTION sync server.
Step 6: Force and verify sync
If you DID NOT start Sync Process above, after activation:
PowerShell command:
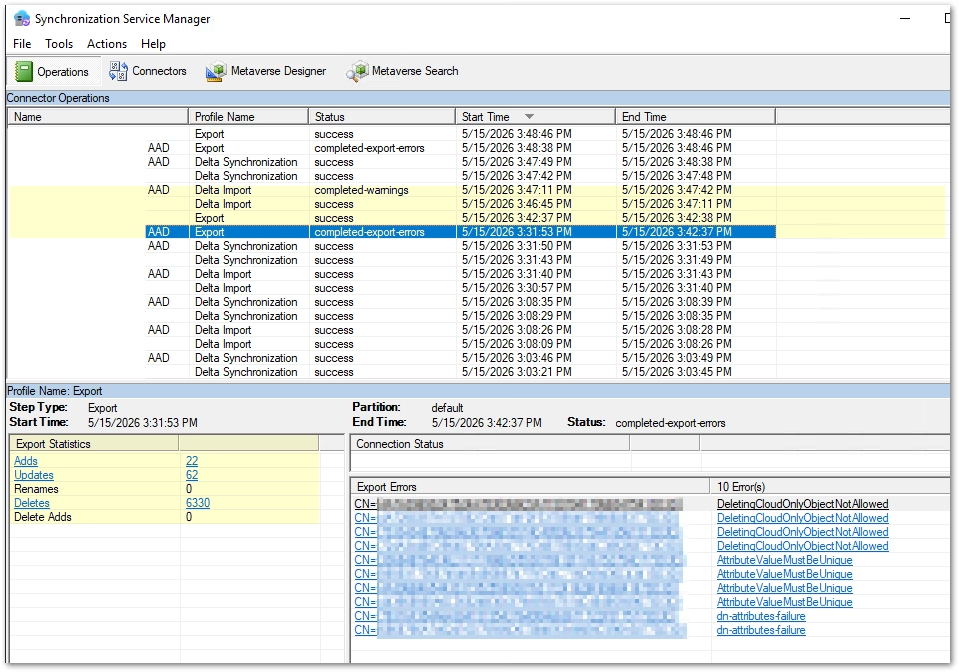
Start-ADSyncSyncCycle -PolicyType DeltaThen monitor:
Synchronization Service Manager and verify:
- Imports succeed
- Sync succeeds
- Exports succeed
- No connector failures
This might take some time. Depending how large your environment is, it could take a few minutes to an hour.
Step 7: Verify Entra ID updates
Test a small safe change:
- Change phone number
- Add/remove test group membership
- Update description field
Confirm the below:
- Change syncs to Entra ID
- Password sync still works (if enabled)
Step 8: Leave the old server in staging mode
After the new server is active and sync health looks good, do not rush to uninstall the old Entra Connect server.
The better approach is to leave the old server powered on, healthy, and in staging mode. This gives you a ready failover server if the new production server has an issue later.
In staging mode, the old server can continue to import and synchronize data, but it will not export changes to Microsoft Entra ID. That makes it useful for validation, troubleshooting, and disaster recovery without having two active export servers.
Microsoft recommends using a second Entra Connect server in staging mode as a standby configuration for business continuity and failover scenarios.
Manage Staging Mode with PowerShell (advanced)
You can ENABLE staging mode entirely through PowerShell.
PowerShell command:
$ADSyncSettings = Get-ADSyncGlobalSettings
($ADSyncSettings.parameters | Where-Object {
$_.Name -eq "Microsoft.Synchronize.StagingMode"
}).value = "True"

Set-ADSyncGlobalSettings $ADSyncSettings
You can DISABLE staging mode entirely through PowerShell.
PowerShell command:
$ADSyncSettings = Get-ADSyncGlobalSettings
($ADSyncSettings.parameters | Where-Object {
$_.Name -eq "Microsoft.Synchronize.StagingMode"
}).value = "False"

Set-ADSyncGlobalSettings $ADSyncSettings
Biggest mistakes to avoid
- Activating staging server BEFORE disabling prod
This can create dual export conflicts. - Not validating pending exports
Could accidentally delete/update many objects. - Forgetting custom sync rules
Staging server must match production config. - Different filtering/OU scope
Can cause massive deprovisioning. - Decommissioning old server too quickly
Keep rollback available for a while.
Official Microsoft references
- Microsoft Entra Connect staging server guidance
- Microsoft upgrade and swing migration guidance
- Import/export Entra Connect configuration
- Entra Connect architecture overview
Found this useful? Share with others: